Sew, plait, and be happy: below we show you how to sew these trousers that take the form of everyday jeans with elastic and a faux fly front zipper.
STEP 1: CUT OUT THE FABRIC PIECES

Fold the fabric in half lengthwise, right side facing in. Pin the paper pattern pieces to the fabric as shown in the pattern layout, pinning pieces 6 to 8 at the fabric fold. Use tailor's chalk to mark 1.5 cm (5/8") seam allowances and 3 cm (11/4") hem allowance (on pieces 1 and 2) at the edges of the paper pattern pieces. Cut out the pieces on these lines.
STEP 2: TRANSFER PATTERN MARKINGS

Use dress maker's carbon paper and a tracing wheel to transfer the pattern outlines (seam and hem lines) and all other markings to the wrong side of the pieces. Follow the instructions included with the carbon paper. The stitching line on piece 1 is marked for size 34. Mark the line for sizes 36 to 44 the same distance from centre front as for size 34. Use basting thread to transfer the stitching line, the abutting lines and hem lines to the right side of the fabric.
STEP 3: BACK POCKETS

Neaten all pocket edges. First press allowance at upper edge of pocket to inside and pin. Topstitch close to edge and again 1.2 cm (1/2") next to edge. Then press remaining allowances to inside. Baste pockets on back trouser pieces at abutting lines. Stitch close to side edges and lower edges and again 7 mm (1/4") next to edges.
STEP 4: HIP YOKE POCKETS

Pin pocket pieces right sides together with pocket opening edge of front trouser pieces (seam number 1) and stitch. Trim allowances. Turn pocket pieces to inside. Baste edges and press. Topstitch close to edges and again 7 mm (1/4") next to edges.
STEP 5: BASTE POCKET OPENING EDGES

Pin pocket opening edges to hip yoke pieces as illustrated so that they meet with marked abutting line. Baste pocket opening edges.
STEP 6: STITCH POCKET PIECES TOGETHER

Pin pocket pieces on inside of hip yoke pieces with right sides facing and stitch. Neaten allowances together. Baste upper and side edges on front trouser pieces.
STEP 7: SIDE SEAMS AND INSIDE LEG SEAMS

Lay front trouser pieces right sides together with back trouser pieces. Pin side seams (seam number 2) and inside leg seams (seam number 3). Stitch seams. Neaten allowances and press open.
STEP 8: STITCH ON OUTSIDE WAISTBAND

Pin outside waistband pieces right sides together with upper trouser edges, matching centres (seam number 5) and stitch. Trim allowances and press open.
STEP 9: CENTRE SEAM

Turn one trouser leg. Place trouser legs one inside the other with right sides facing. Pin ends of inside leg seams together, then pin centre seam and baste from front to upper back edge of waistband, also basting front slit closed.
STEP 10: CENTRE SEAM

Stitch centre seam from slit mark to upper back edge. Backstitch to secure ends of stitching. Trim allowances to 1 cm (3/8").
STEP 11: (MOCK) FRONT SLIT
 FRONT SLIT")
Neaten self-facings and allowances of centre seam together and press onto right trouser leg. Baste facings on right trouser and waistband piece. Topstitch right trouser piece at slit as marked, catching facings. Topstitch close to centre seam from slit mark to back edge and again 7 mm (1/4") next to seam. Undo basting at slit. Work BUTTONHOLE crosswise on right edge of waistband at x.
STEP 12: WAISTBAND / UPPER FRILL

Join ends of strip for frill together to form a round. Press allowances open. Fold frill on fold line, wrong side facing in. Press fold edge. Pin waistband closed. Baste open frill edges together and pin right sides together with upper waistband edge, matching seam with centre back. Baste frill
STEP 13: INSIDE WAISTBAND

Just baste panel seams on inside waist-band pieces (seam number 4). Press allowances open. Pin waistband pieces on outside waistband with right sides facing, matching centres and with ends meeting. Stitch outside waistband pieces, catching in frill. Press allowances onto waistband, neaten other long edge of waistband. Turn waistband pieces to inside, lay over joining seam and pin. Work from outside of waistband to stitch in line of joining seam, catching inside waistband pieces.
STEP 14: ELASTIC CASING

Topstitch waistband for elastic casings twice at intervals of 1 cm (3/8"), ending at inside seams. Undo basting at seams. Cut elastic into three equal pieces. Use safety pins to insert elastic through openings in seams. Pin ends of elastic. Try on garment to check the fit. Slip ends of elastic into front waistband and pin. Sew up openings in seams by hand. Work from inside to stitch waistband in line of seams, stitching across ends of elastic.
STEP 15: BELT CARRIERS

Press long edges of fabric strip for belt carriers in to center and press strip in half lengthwise. Stitch together close to edges, topstitch close to fold edge. Cut strip into 7 equal pieces. Neaten ends.
STEP 16: STITCH ON BELT CARRIERS

Stitch belt carriers on trouser pieces about 2 cm (3/4") below waistband joining seam: about 6 cm (23/8") right and left of centre front, over side seams, centre back seam and centred in between. Press belt carriers up, turn in ends. Pin ends on upper edge of waistband (frill joining seam) and stitch close to edge. Backstitch to secure ends of stitching.
STEP 17: HEM / BUTTON

Neaten hem allowance, press to inside and pin. Topstitch lower edge of trouser legs 2 cm (3/4") wide and again 7 mm (1/4") next to line of stitching, catching hem. Sew button to waistband (through buttonhole).
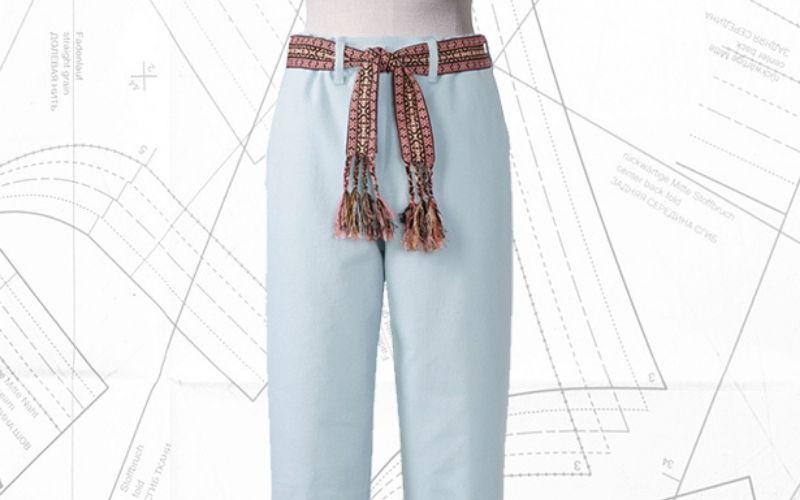
STEP 18: TIE BELT

Draw out threads from ends of woven trim to make fringe abut 20 cm (8") long. Divide threads into three equal groups and plait each as illustrated. Wrap ends tightly with a piece of thread to prevent them from coming apart.
FINISHED!

Jeans are somehow so... uncomfortable? That may basically true – but thanks to the wide waistband with elastic and loose cut of the legs (which also make them nice and airy, by the way) these trousers are an exception. Download the pattern here