
Refer to "the pattern’s store page here" for specific fabric yardage and notion requirements. Also remember to add seam allowance (you can either add to the paper pattern before cutting or to the fabric around the pattern… see below), further info and amounts can be found in the instructions PDF after purchase.


Step 1: CUT OUT FABRIC PIECES Fold fabric in half lengthwise, right side facing in. Pin paper pattern pieces to the fabric as shown in the cutting layout. Place pieces 21 and 22 on the fabric fold. With a ruler and tailor’s chalk, mark the seam and hem allowances, as follows: 1.5 cm (5/8") at seams and edges, 3 cm (1_") for the hem, and 2 cm (_") for the sleeve hems. Finally, draw the measured piece (a) directly on the fabric, with tailor's chalk and a ruler. Cut out all fabric pieces.
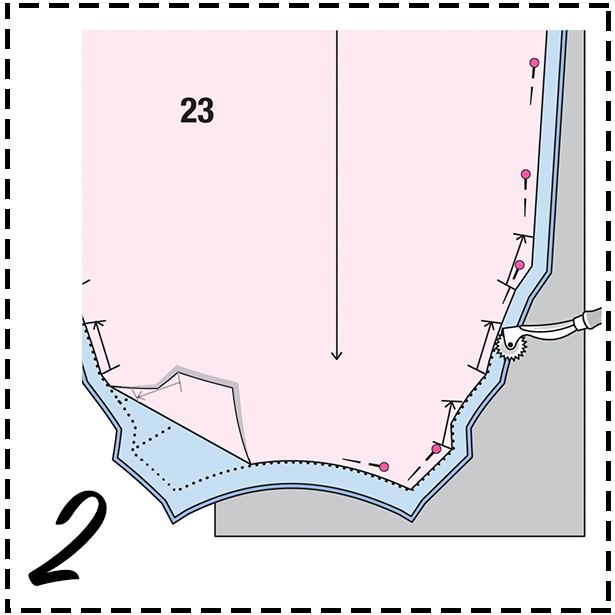
Step 2: TRANSFER PATTERN MARKINGS TO THE FABRIC On all fabric pieces, use dressmaker’s carbon paper and a tracing wheel to transfer the pattern outlines (seam and hem lines) and all other pattern markings to the wrong side of the fabric. Follow the instructions included with the carbon paper. Hand baste along the tuck lines, to make them visible on the right side of the fabric (see Step 6).
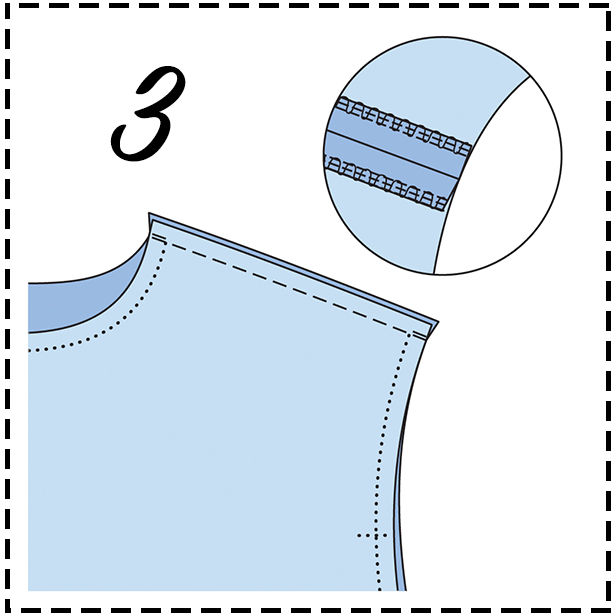
Step 3: SHOULDER SEAMS Lay front piece on back piece, right sides facing. Pin the shoulder seams, matching seam numbers (1). Stitch the shoulder seams. Finish the edges of the seam allowances with zigzag stitches or overlock stitches. Press the seams open.
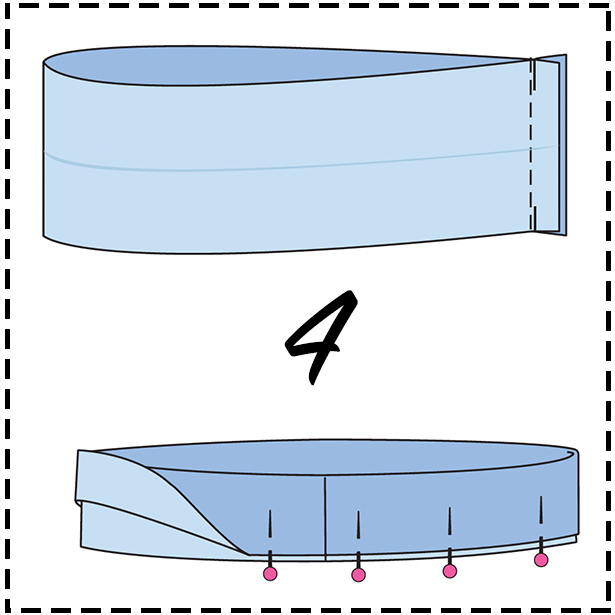
Step 4: NECK BAND Fold the neck band piece in half lengthwise, wrong side facing in. Press the fold edge. Unfold the piece again. Pin the narrow edges together, right side facing in. Stitch the narrow edges together, tying off the ends of the seam with backstitching. Press the seam open. Again fold the neck band in half lengthwise. Pin the long edges together.
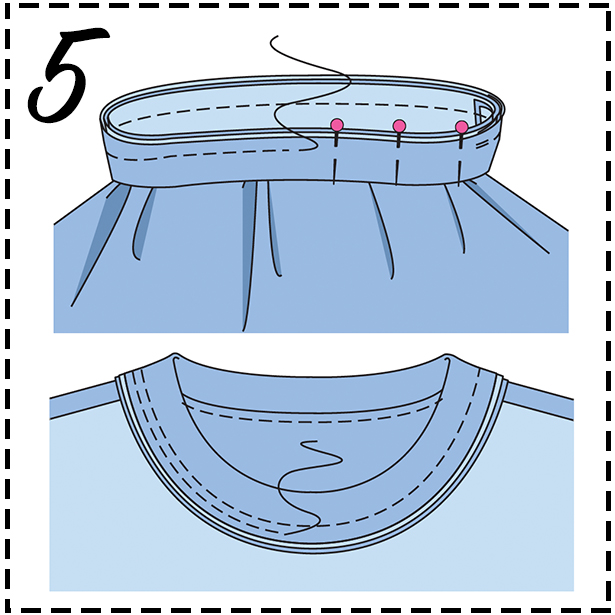
Step 5: ATTACH NECK BAND Pin open edges of the neck band together to the neck edge, right sides facing, matching the neck band seam to one shoulder seam. Stitch the neck band in place. Finish the edges of the seam allowances together. Turn the neck band toward the neck opening and press the seam allowances toward the front and back pieces. Topstitch the neck edge approx. 3 mm (1/8") from the neck band attachment seam, catching the allowances.
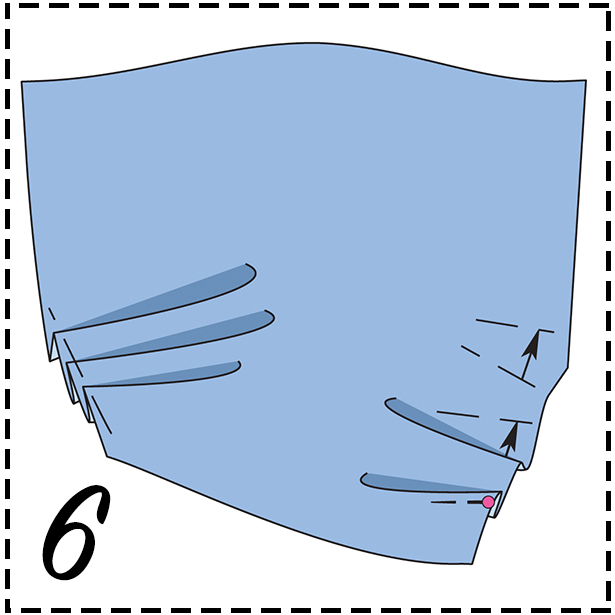
Step 6: SLEEVE TUCKS Working from the right side of the fabric, lay tucks in each sleeve, in the direction of the arrows, matching the basting lines. Pin the tucks and baste them to the seam allowances on the side edges of the sleeve.
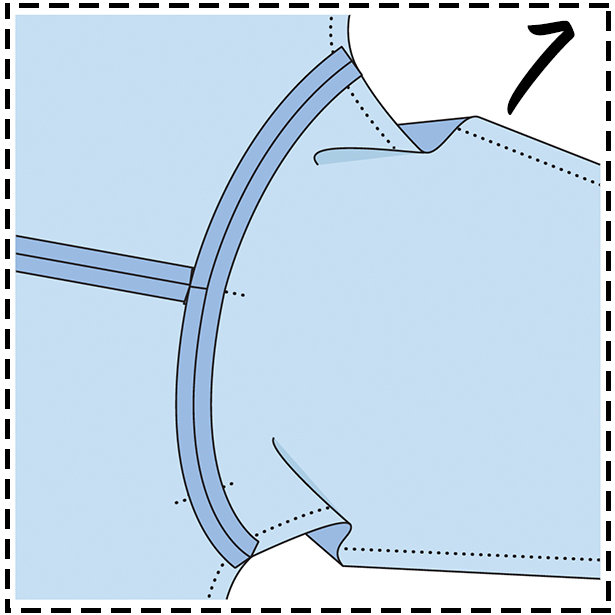
Step 7: ATTACH SLEEVES Pin each sleeve to armhole edge, right sides facing. The seam marks (2) on sleeve and front piece must match. The seam mark at the centre of the sleeve cap must meet the shoulder seam. Stitch the sleeve in place. Finish the edges of the seam allowances. Press the seam open.
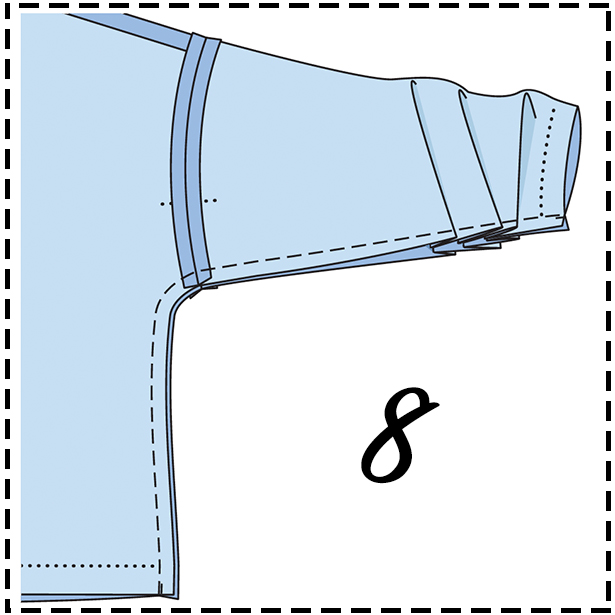
Step 8: SLEEVE AND SIDE SEAMS Lay front piece on back piece, right sides facing, folding the sleeves lengthwise. First pin the ends of each sleeve attachment seam together, then pin the sleeve and side seams. The tucks on each sleeve must meet. Stitch the seams. Finish the edges of the seam allowances. Press the seams open.
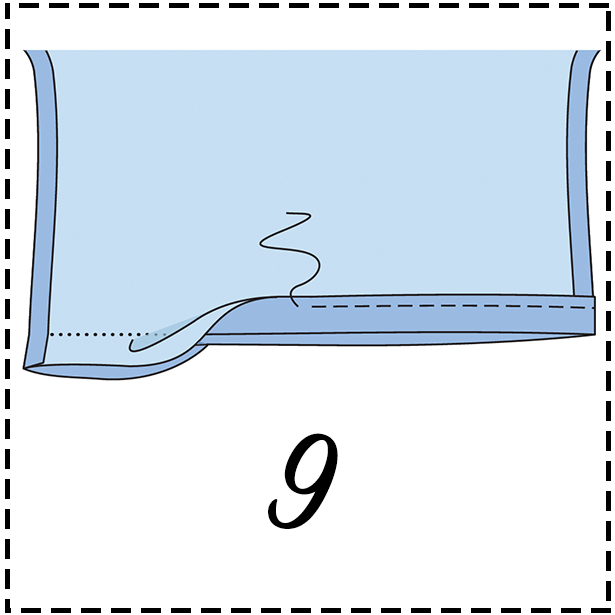
Step 9: HEM / SLEEVE HEMS Finish the lower edges of the sweatshirt and the sleeves. Fold the hem allowances to the inside and pin them in place. Press the edges. Topstitch 2.5 cm (1") from the lower edge of the sweatshirt and 1.5 cm (5/8") from the lower edges of the sleeves, thereby catching the hems.
FINISHED!
Step 1: CUT OUT FABRIC PIECES Fold fabric in half lengthwise, right side facing in. Pin paper pattern pieces to the fabric as shown in the cutting layout. Place pieces 21 and 22 on the fabric fold. With a ruler and tailor’s chalk, mark the seam and hem allowances, as follows: 1.5 cm (5/8") at seams and edges, 3 cm (1_") for the hem, and 2 cm (_") for the sleeve hems. Finally, draw the measured piece (a) directly on the fabric, with tailor's chalk and a ruler. Cut out all fabric pieces.
Step 2: TRANSFER PATTERN MARKINGS TO THE FABRIC On all fabric pieces, use dressmaker’s carbon paper and a tracing wheel to transfer the pattern outlines (seam and hem lines) and all other pattern markings to the wrong side of the fabric. Follow the instructions included with the carbon paper. Hand baste along the tuck lines, to make them visible on the right side of the fabric (see Step 6).
Step 3: SHOULDER SEAMS Lay front piece on back piece, right sides facing. Pin the shoulder seams, matching seam numbers (1). Stitch the shoulder seams. Finish the edges of the seam allowances with zigzag stitches or overlock stitches. Press the seams open.
Step 4: NECK BAND Fold the neck band piece in half lengthwise, wrong side facing in. Press the fold edge. Unfold the piece again. Pin the narrow edges together, right side facing in. Stitch the narrow edges together, tying off the ends of the seam with backstitching. Press the seam open. Again fold the neck band in half lengthwise. Pin the long edges together.
Step 5: ATTACH NECK BAND Pin open edges of the neck band together to the neck edge, right sides facing, matching the neck band seam to one shoulder seam. Stitch the neck band in place. Finish the edges of the seam allowances together. Turn the neck band toward the neck opening and press the seam allowances toward the front and back pieces. Topstitch the neck edge approx. 3 mm (1/8") from the neck band attachment seam, catching the allowances.
Step 6: SLEEVE TUCKS Working from the right side of the fabric, lay tucks in each sleeve, in the direction of the arrows, matching the basting lines. Pin the tucks and baste them to the seam allowances on the side edges of the sleeve.
Step 7: ATTACH SLEEVES Pin each sleeve to armhole edge, right sides facing. The seam marks (2) on sleeve and front piece must match. The seam mark at the centre of the sleeve cap must meet the shoulder seam. Stitch the sleeve in place. Finish the edges of the seam allowances. Press the seam open.
Step 8: SLEEVE AND SIDE SEAMS Lay front piece on back piece, right sides facing, folding the sleeves lengthwise. First pin the ends of each sleeve attachment seam together, then pin the sleeve and side seams. The tucks on each sleeve must meet. Stitch the seams. Finish the edges of the seam allowances. Press the seams open.
Step 9: HEM / SLEEVE HEMS Finish the lower edges of the sweatshirt and the sleeves. Fold the hem allowances to the inside and pin them in place. Press the edges. Topstitch 2.5 cm (1") from the lower edge of the sweatshirt and 1.5 cm (5/8") from the lower edges of the sleeves, thereby catching the hems.
FINISHED!