Refer to the "pattern’s store page" for specific fabric yardage and notion requirements. Also remember to add seam allowance (you can either add to the paper pattern before cutting or to the fabric around the pattern… see below), further info and amounts can be found in the instructions PDF after purchase.


STEP 1: CUT OUT THE FABRIC PIECES Fold fabric in half lengthwise with right side facing in. Use tailor's chalk to mark pattern pieces 1 and 3 each 4x on the fabric along the edges of the paper pattern pieces as shown in the pattern layout. Add 1.5 cm (5/8") seam allowances round the edges of the pieces and also 3 cm (1 1/4") hem allowance. Finally, use tailor's chalk and a ruler to mark pieces a and b directly on the fabric. Now cut out all pieces. Cut piece 1 likewise from lining with 1.5 cm (5/8") seam and hem allowances (see pattern layout).
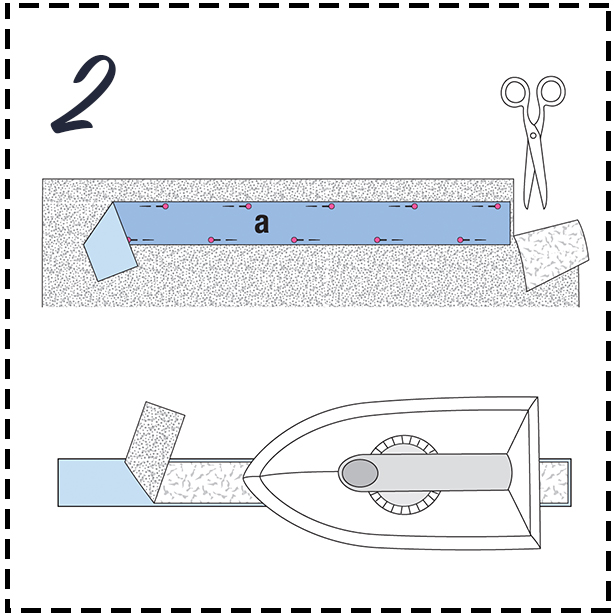
STEP 2: THE INTERFACING Pin the waistband, fabric piece a, to the interfacing with the wrong fabric side facing the adhesive side of the interfacing. Cut out the piece. Iron the interfacing on the wrong side of the fabric.
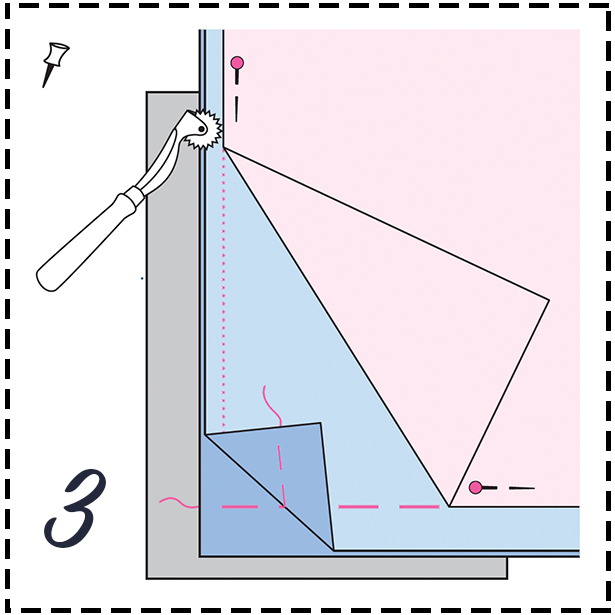
STEP 3: TRANSFER PATTERN MARKINGS Use dressmaker's carbon paper and a tracing wheel to transfer the pattern outlines (seam and hem lines) and all other lines and marking to the wrong side of the pieces. Follow the instructions included with the carbon paper. Use basting thread and hand stitches to transfer the hem line to the right fabric side of the skirt panels and godet pieces.
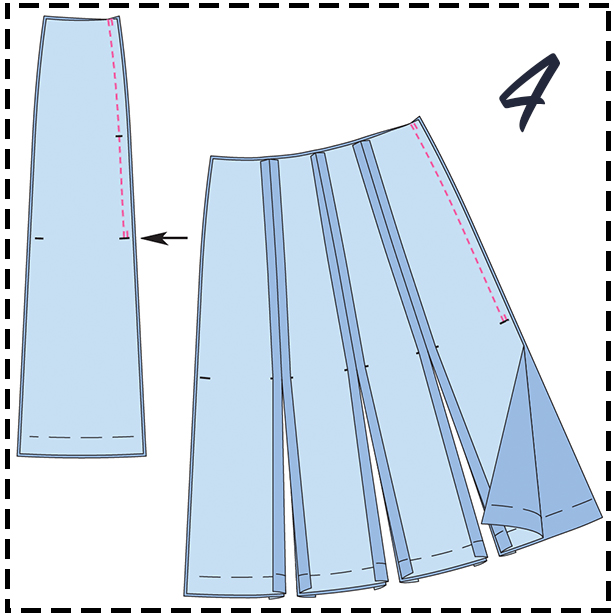
STEP 4: PANEL SEAMS Lay two skirt panels each together with right sides facing. Pin edges together. Pin and stitch seams each from upper edges to marking (2). Backstitch to secure ends of stitching. Press allowances open. Important: Do not yet stitch skirt together to a round.
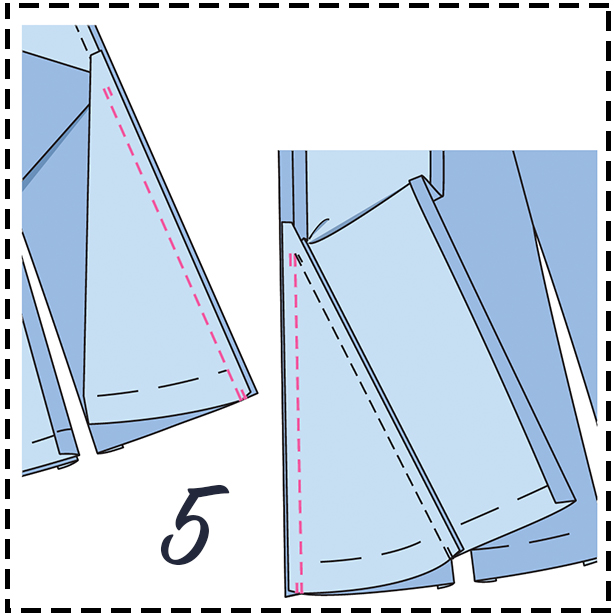
STEP 5: STITCH ON GODETS Pin one godet right sides together with one skirt panel and stitch from marking (2) to lower edges. Allowance of godet overhangs at the top at marking. Backstich to secure ends of stitching. Stitch other edge of godet likewise. Continue in this manner to stitch on 7 godets below the panel seams. Trim allowances of seams to 7 mm (1/4") from top to bottom. Neaten allowances and press open from top to marking. Press allowances at godets onto skirt panels.

STEP 6: STITCH ON WAISTBAND Press waistband in half lengthwise with wrong side facing in. Unfold waistband again. Pin and stitch waistband right sides together with upper skirt edge. Press allowances onto waistband.
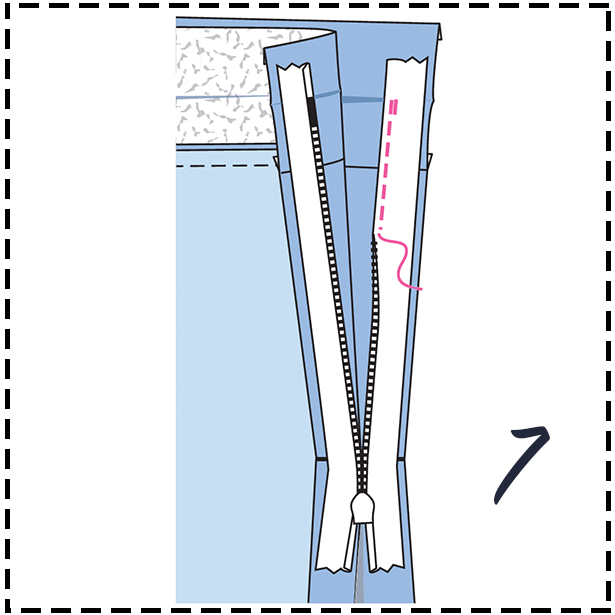
STEP 7: INVISIBLE ZIP Open zip and pin face down right sides together with one opening edge. Teeth of zip begin on pressed crease of waistband and they lie on marked seam line with the zip tapes on the allowance. Attach the special presser foot for invisible zips to your sewing machine. Stitch close to teeth of zip as far as slit mark. The teeth of an invisible zip roll inward and are held flat by the special presser foot.
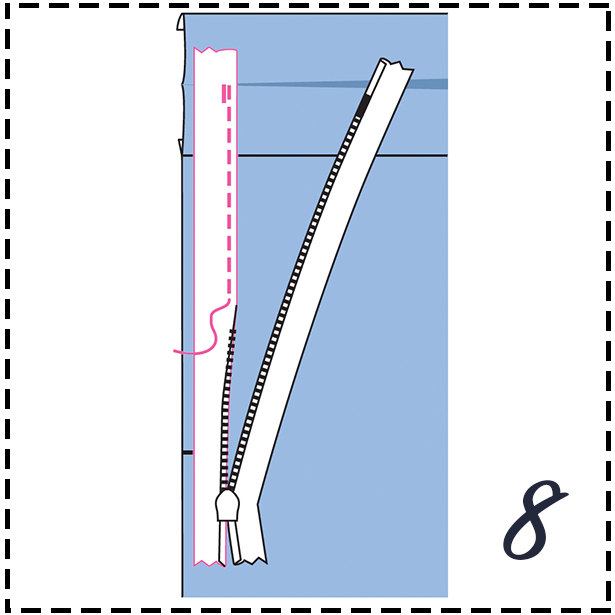
STEP 8: INVISBLE ZIP Pin and stitch other half of zip to other opening edge likewise. Stitch both halves of zip from top to slit mark. Backstitch to secure ends of stitching.

STEP 9: CENTRE BACK SEAM Lay both skirt panels with the zip together with right sides facing. Stitch centre back seam from marking 2 as far as possible to ends of zip stitching lines, laying end of zip aside. Backstitch to secure ends of stitching. Press allowances open. Stitch on last godet as instructed in step 5.

STEP 10: STITCH ON SKIRT LINING Stitch panel seams of skirt lining. Stitch centre back seam from slit mark to lower edges. Neaten allowances and press open. Pin skirt lining right sides together with waistband and stitch, laying allowances at opening edges out fl at again. Press allowances onto lining. Turn in allowances at narrow edges of waistband. Turn waistband to inside on pressed crease and pin. Sew on opening edges of lining along zip tapes by hand. Work from right side of garment to stitch in line of waistband joining seam.
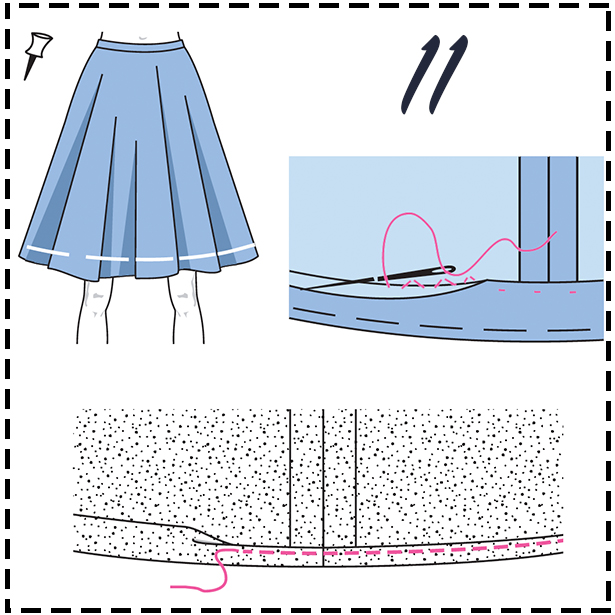
STEP 11: HEM LINING/SKIRT Tip: Leave skirt to hang for a few days. Then check the length and even out the hem edge if necessary. Neaten hem, turn to inside and baste. Stitch hem loosely by hand. Press lower edge of skirt. Press hem of lining under, turn in and pin. Stitch a narrow hem. The skirt lining should be slightly shorter than the skirt.

STEP 12: TIE BAND Stitch pieces b right sides together at one end. Press allowances open. Fold tie band in half lengthwise, right side facing in. Stitch open edges together 1.5 cm (5/8") wide, leaving an opening for turning. Backstitch to secure ends of stitching. Trim allowances, trim corners at an angle. Turn tie band, press. Sew up opening in seam by hand.

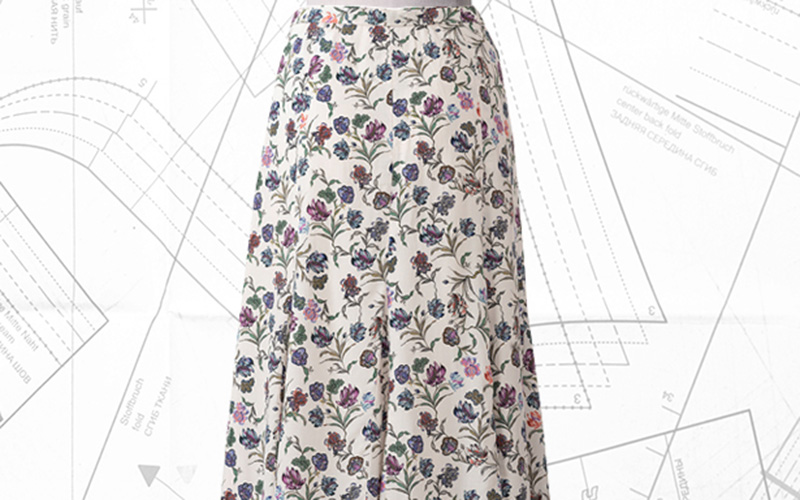
FINISHED! An extra swing thanks to the godets for this knee-covering skirt with the extra-narrow waistband.
STEP 1: CUT OUT THE FABRIC PIECES Fold fabric in half lengthwise with right side facing in. Use tailor's chalk to mark pattern pieces 1 and 3 each 4x on the fabric along the edges of the paper pattern pieces as shown in the pattern layout. Add 1.5 cm (5/8") seam allowances round the edges of the pieces and also 3 cm (1 1/4") hem allowance. Finally, use tailor's chalk and a ruler to mark pieces a and b directly on the fabric. Now cut out all pieces. Cut piece 1 likewise from lining with 1.5 cm (5/8") seam and hem allowances (see pattern layout).
STEP 2: THE INTERFACING Pin the waistband, fabric piece a, to the interfacing with the wrong fabric side facing the adhesive side of the interfacing. Cut out the piece. Iron the interfacing on the wrong side of the fabric.
STEP 3: TRANSFER PATTERN MARKINGS Use dressmaker's carbon paper and a tracing wheel to transfer the pattern outlines (seam and hem lines) and all other lines and marking to the wrong side of the pieces. Follow the instructions included with the carbon paper. Use basting thread and hand stitches to transfer the hem line to the right fabric side of the skirt panels and godet pieces.
STEP 4: PANEL SEAMS Lay two skirt panels each together with right sides facing. Pin edges together. Pin and stitch seams each from upper edges to marking (2). Backstitch to secure ends of stitching. Press allowances open. Important: Do not yet stitch skirt together to a round.
STEP 5: STITCH ON GODETS Pin one godet right sides together with one skirt panel and stitch from marking (2) to lower edges. Allowance of godet overhangs at the top at marking. Backstich to secure ends of stitching. Stitch other edge of godet likewise. Continue in this manner to stitch on 7 godets below the panel seams. Trim allowances of seams to 7 mm (1/4") from top to bottom. Neaten allowances and press open from top to marking. Press allowances at godets onto skirt panels.
STEP 6: STITCH ON WAISTBAND Press waistband in half lengthwise with wrong side facing in. Unfold waistband again. Pin and stitch waistband right sides together with upper skirt edge. Press allowances onto waistband.
STEP 7: INVISIBLE ZIP Open zip and pin face down right sides together with one opening edge. Teeth of zip begin on pressed crease of waistband and they lie on marked seam line with the zip tapes on the allowance. Attach the special presser foot for invisible zips to your sewing machine. Stitch close to teeth of zip as far as slit mark. The teeth of an invisible zip roll inward and are held flat by the special presser foot.
STEP 8: INVISBLE ZIP Pin and stitch other half of zip to other opening edge likewise. Stitch both halves of zip from top to slit mark. Backstitch to secure ends of stitching.
STEP 9: CENTRE BACK SEAM Lay both skirt panels with the zip together with right sides facing. Stitch centre back seam from marking 2 as far as possible to ends of zip stitching lines, laying end of zip aside. Backstitch to secure ends of stitching. Press allowances open. Stitch on last godet as instructed in step 5.
STEP 10: STITCH ON SKIRT LINING Stitch panel seams of skirt lining. Stitch centre back seam from slit mark to lower edges. Neaten allowances and press open. Pin skirt lining right sides together with waistband and stitch, laying allowances at opening edges out fl at again. Press allowances onto lining. Turn in allowances at narrow edges of waistband. Turn waistband to inside on pressed crease and pin. Sew on opening edges of lining along zip tapes by hand. Work from right side of garment to stitch in line of waistband joining seam.
STEP 11: HEM LINING/SKIRT Tip: Leave skirt to hang for a few days. Then check the length and even out the hem edge if necessary. Neaten hem, turn to inside and baste. Stitch hem loosely by hand. Press lower edge of skirt. Press hem of lining under, turn in and pin. Stitch a narrow hem. The skirt lining should be slightly shorter than the skirt.
STEP 12: TIE BAND Stitch pieces b right sides together at one end. Press allowances open. Fold tie band in half lengthwise, right side facing in. Stitch open edges together 1.5 cm (5/8") wide, leaving an opening for turning. Backstitch to secure ends of stitching. Trim allowances, trim corners at an angle. Turn tie band, press. Sew up opening in seam by hand.
FINISHED! An extra swing thanks to the godets for this knee-covering skirt with the extra-narrow waistband.