
Refer to the "pattern’s store page" for specific fabric yardage and notion requirements. Also remember to add seam allowance (you can either add to the paper pattern before cutting or to the fabric around the pattern… see below), further info and amounts can be found in the instructions PDF after purchase.


STEP 1: CUT OUT THE FABRIC PIECES Fold fabric in half lengthwise with right side facing in. Pin paper pattern pieces to the fabric as shown in the pattern layout. Place pieces 2 and 5 at the fabric fold. Use the hand gauge and tailor's chalk to mark 1.5 cm (5/8") seam allowances on the fabric round all edges of the pieces and also 4 cm (1 5/8") hem allowance on front and back. Cut out the pieces on these lines.
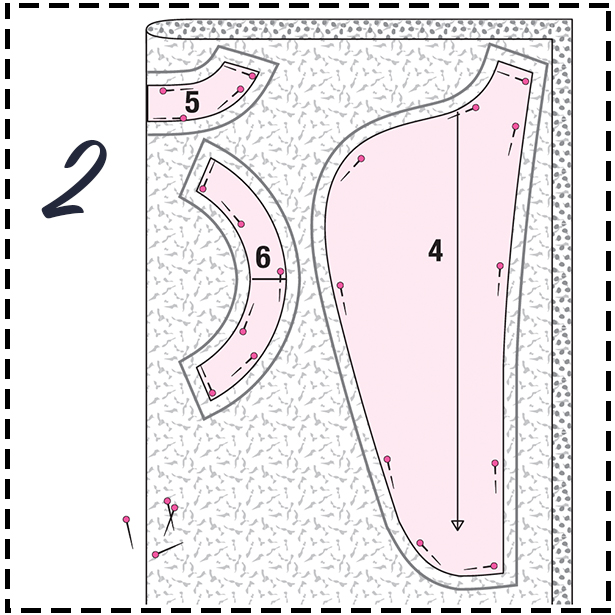
STEP 2: CUT OUT THE INTERFACING Fold interfacing in half, adhesive side facing in. Pin on pieces 4, 5 and 6 as illustrated. Pin piece 5 at the fold. Mark 1.5 cm (5/8") seam allowances round the edges. Cut out the pieces and iron on the wrong fabric side of the respective pattern pieces.
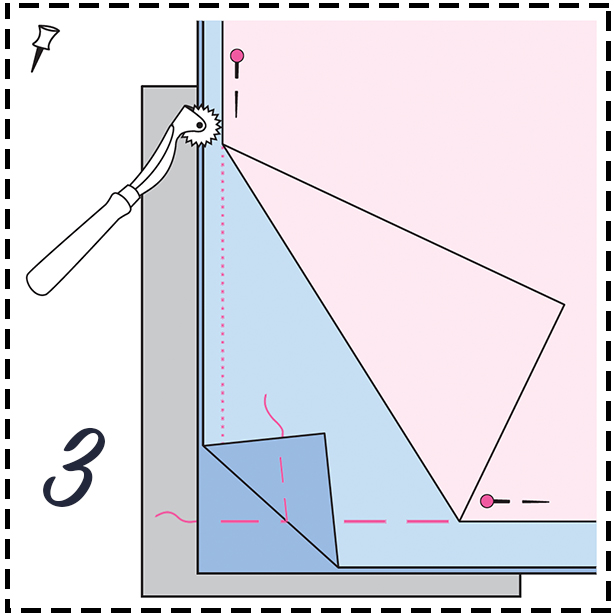
STEP 3: TRANSFER PATTERN MARKINGS Fold back facing piece in half, right side facing in. Lay front facings and sleeve facings right sides together. Pin on pattern pieces again. Use dressmaker's carbon paper and a tracing wheel to transfer the pattern outlines (seam and hem lines) and all other lines and marking to the wrong side of the pieces. Follow the instructions included with the carbon paper. Use basting thread to mark centre front and hem line on right fabric side. Mark buttonholes later (see step 17).
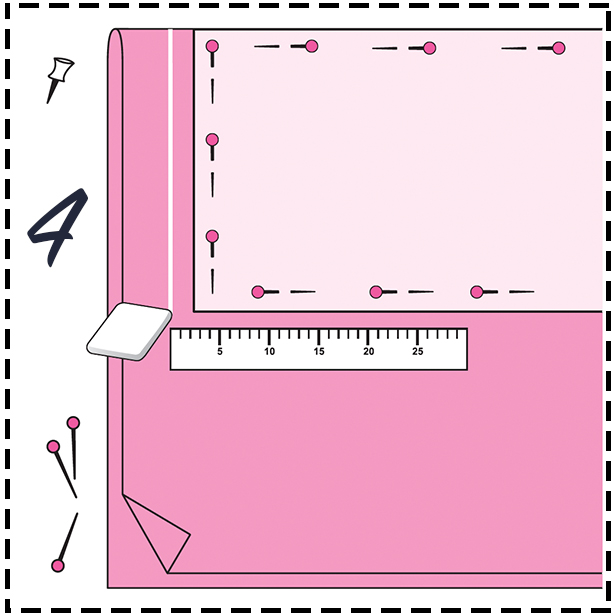
STEP 4: CUT OUT THE LINING PIECES Fold lining in half lengthwise, right side facing in. Pin pieces 3, 7 and 8 to lining as shown in pattern layout. Use tailor's chalk to mark 1.5 cm (5/8") seam and hem allowances. Cut out all the pieces. Transfer the pattern outlines to the wrong side of the lining pieces with carbon paper.

STEP 5: SHOULDER SEAMS Lay front pieces right sides together with back. Baste shoulder seams (seam number 1), slightly easing back shoulder edges from neckline to •. Stitch shoulder seams. Press allowances open.

STEP 6: SLEEVES / STITCH DARTS Pin darts at each lower sleeve edge and stitch toward points of darts. Knot ends of thread. Press darts to one side.

STEP 7: STITCH ON SLEEVES Pin sleeve right sides together with armhole edge, matching markings 2. Match marking at sleeve cap with shoulder seam. Stitch. Press allowances open.

STEP 8: SIDE SEAMS AND SLEEVE SEAMS Lay front right sides together with back. Pin ends of sleeve inset seams together. Pin side seams and sleeve seams (seam number 4). Stitch seams. Press allowances open.

STEP 9: SLEEVE FACINGS Join each facing piece to a round. Press allowances open. Pin facings right sides together with lower sleeve edges, matching seams. Stitch. Trim allowances, clip curves. Lay facings down, press allowances onto facings and stitch close to seam. Turn facings to inside, baste. Press edges. Sew facings on at darts and sleeve seams by hand.

STEP 10: FACINGS / SHOULDER SEAMS Lay front facings right sides together with back facing. Pin shoulder edges together and stitch. Press allowances open.

STEP 11: STITCH FACING Pin facing right sides together with front pieces and neckline, matching shoulder seams. Stitch facing, stitch at the bottom on marked hem line. Trim allowances, clip curves at several intervals close to line of stitching. Trim hem allowance to just 2 cm (3/4") before each facing end (arrow).

STEP 12: TURN FACING TO INSIDE / SEW HEM Turn facing to inside. Baste edges. Turn hem allowance to inside, baste. Press edges. Stitch hem loosely by hand. Sew on inside facing edge at hem.

STEP 13: CONSTRUCT LINING Stitch shoulder seams on lining pieces, press allowances open. Stitch sleeve darts, press to one side. Press allowance at lower sleeve edges to inside. Stitch sleeves. Press allowances open. Stitch side seams and sleeve seams. Press allowances open. Press allowance at lower lining edge to inside.

STEP 14: STITCH LINING TO FACING Pin lining right sides together with facing, matching shoulder seams. Stitch lining, beginning and ending 10 cm (4") above hem edge (arrow). Clip allowance of lining at back neck edge.
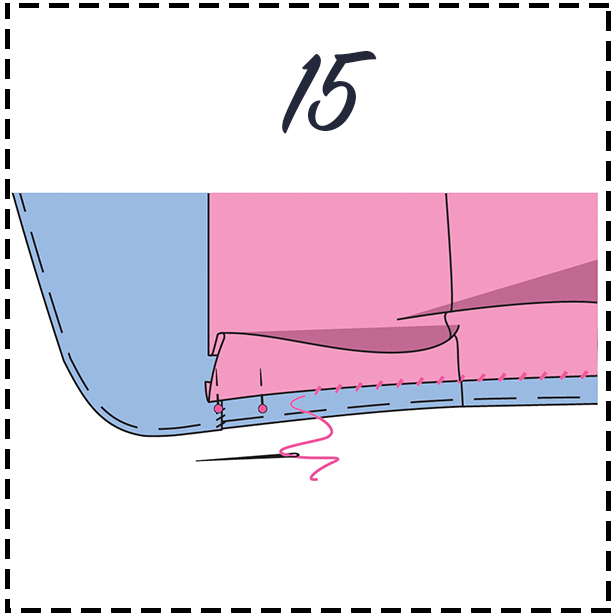
STEP 15: SEW ON LINING Lay lining inside jacket with wrong sides facing. Place sleeve linings inside sleeves of top fabric. Press allowances at facing onto lining. Push up lower lining edge slightly and sew on at hem by hand.

STEP 16: SEW ON REMAINDER OF LINING Lay extra length of lining down like a small fold. Sew on remaining edges of lining at front facings. Sew on lower edge of sleeve linings at sleeve facings by hand.
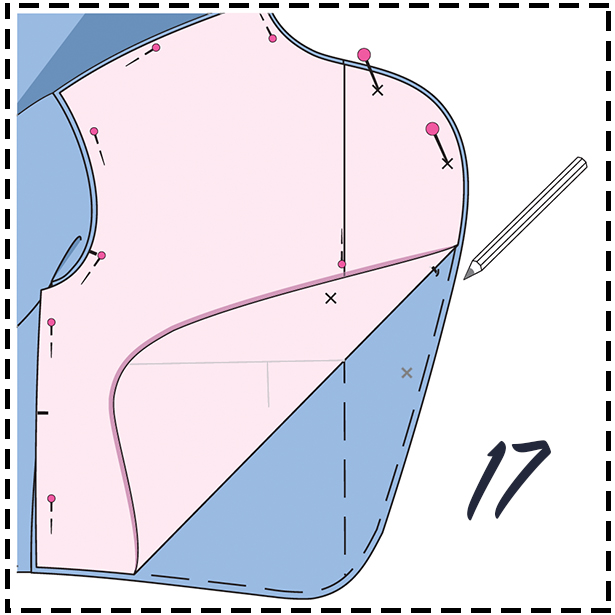
STEP 17: MARK BUTTONHOLES The x for the buttonholes on paper pattern piece 1 are marked for size 36. Remark the x for sizes 38 to 44 according to the neckline and the front edge for your size line. The bottom x is the same for all sizes. Move the top x up and space the other x evenly in between. For all sizes, pin the paper pattern piece to the right front and use straight pins and chalk to transfer the x to the fabric.
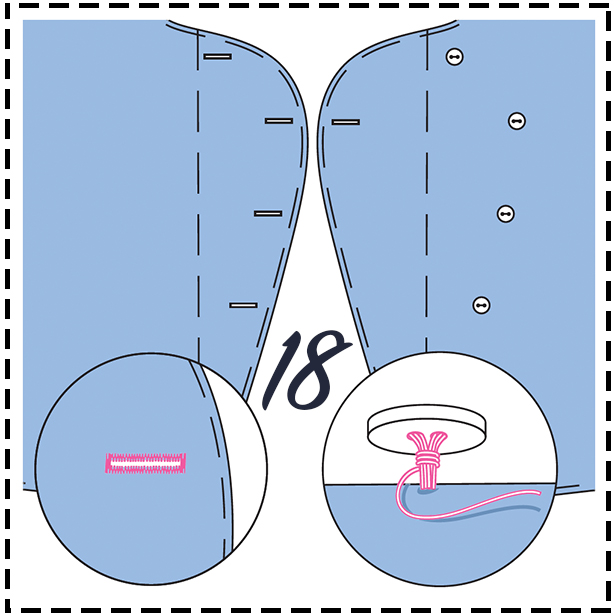
STEP 18: STITCH BUTTONHOLES / SEW ON BUTTONS Work crosswise buttonholes on right front from each marking. Work second buttonhole from the top also on left front for inside button. Gear size of buttonholes to fi t your buttons. Pin jacket closed, matching centers. Mark placement of buttons. Sew buttons on left front. Sew fl at inside button on facing of right front.

FINISHED! Bring a touch of 60s design into your wardrobe with this asymmetric cropped jacket with the contrast color buttons in a horn look. The generous sleeves are drawn in at the hem with darts for a cool boule effect.
STEP 1: CUT OUT THE FABRIC PIECES Fold fabric in half lengthwise with right side facing in. Pin paper pattern pieces to the fabric as shown in the pattern layout. Place pieces 2 and 5 at the fabric fold. Use the hand gauge and tailor's chalk to mark 1.5 cm (5/8") seam allowances on the fabric round all edges of the pieces and also 4 cm (1 5/8") hem allowance on front and back. Cut out the pieces on these lines.
STEP 2: CUT OUT THE INTERFACING Fold interfacing in half, adhesive side facing in. Pin on pieces 4, 5 and 6 as illustrated. Pin piece 5 at the fold. Mark 1.5 cm (5/8") seam allowances round the edges. Cut out the pieces and iron on the wrong fabric side of the respective pattern pieces.
STEP 3: TRANSFER PATTERN MARKINGS Fold back facing piece in half, right side facing in. Lay front facings and sleeve facings right sides together. Pin on pattern pieces again. Use dressmaker's carbon paper and a tracing wheel to transfer the pattern outlines (seam and hem lines) and all other lines and marking to the wrong side of the pieces. Follow the instructions included with the carbon paper. Use basting thread to mark centre front and hem line on right fabric side. Mark buttonholes later (see step 17).
STEP 4: CUT OUT THE LINING PIECES Fold lining in half lengthwise, right side facing in. Pin pieces 3, 7 and 8 to lining as shown in pattern layout. Use tailor's chalk to mark 1.5 cm (5/8") seam and hem allowances. Cut out all the pieces. Transfer the pattern outlines to the wrong side of the lining pieces with carbon paper.
STEP 5: SHOULDER SEAMS Lay front pieces right sides together with back. Baste shoulder seams (seam number 1), slightly easing back shoulder edges from neckline to •. Stitch shoulder seams. Press allowances open.
STEP 6: SLEEVES / STITCH DARTS Pin darts at each lower sleeve edge and stitch toward points of darts. Knot ends of thread. Press darts to one side.
STEP 7: STITCH ON SLEEVES Pin sleeve right sides together with armhole edge, matching markings 2. Match marking at sleeve cap with shoulder seam. Stitch. Press allowances open.
STEP 8: SIDE SEAMS AND SLEEVE SEAMS Lay front right sides together with back. Pin ends of sleeve inset seams together. Pin side seams and sleeve seams (seam number 4). Stitch seams. Press allowances open.
STEP 9: SLEEVE FACINGS Join each facing piece to a round. Press allowances open. Pin facings right sides together with lower sleeve edges, matching seams. Stitch. Trim allowances, clip curves. Lay facings down, press allowances onto facings and stitch close to seam. Turn facings to inside, baste. Press edges. Sew facings on at darts and sleeve seams by hand.
STEP 10: FACINGS / SHOULDER SEAMS Lay front facings right sides together with back facing. Pin shoulder edges together and stitch. Press allowances open.
STEP 11: STITCH FACING Pin facing right sides together with front pieces and neckline, matching shoulder seams. Stitch facing, stitch at the bottom on marked hem line. Trim allowances, clip curves at several intervals close to line of stitching. Trim hem allowance to just 2 cm (3/4") before each facing end (arrow).
STEP 12: TURN FACING TO INSIDE / SEW HEM Turn facing to inside. Baste edges. Turn hem allowance to inside, baste. Press edges. Stitch hem loosely by hand. Sew on inside facing edge at hem.
STEP 13: CONSTRUCT LINING Stitch shoulder seams on lining pieces, press allowances open. Stitch sleeve darts, press to one side. Press allowance at lower sleeve edges to inside. Stitch sleeves. Press allowances open. Stitch side seams and sleeve seams. Press allowances open. Press allowance at lower lining edge to inside.
STEP 14: STITCH LINING TO FACING Pin lining right sides together with facing, matching shoulder seams. Stitch lining, beginning and ending 10 cm (4") above hem edge (arrow). Clip allowance of lining at back neck edge.
STEP 15: SEW ON LINING Lay lining inside jacket with wrong sides facing. Place sleeve linings inside sleeves of top fabric. Press allowances at facing onto lining. Push up lower lining edge slightly and sew on at hem by hand.
STEP 16: SEW ON REMAINDER OF LINING Lay extra length of lining down like a small fold. Sew on remaining edges of lining at front facings. Sew on lower edge of sleeve linings at sleeve facings by hand.
STEP 17: MARK BUTTONHOLES The x for the buttonholes on paper pattern piece 1 are marked for size 36. Remark the x for sizes 38 to 44 according to the neckline and the front edge for your size line. The bottom x is the same for all sizes. Move the top x up and space the other x evenly in between. For all sizes, pin the paper pattern piece to the right front and use straight pins and chalk to transfer the x to the fabric.
STEP 18: STITCH BUTTONHOLES / SEW ON BUTTONS Work crosswise buttonholes on right front from each marking. Work second buttonhole from the top also on left front for inside button. Gear size of buttonholes to fi t your buttons. Pin jacket closed, matching centers. Mark placement of buttons. Sew buttons on left front. Sew fl at inside button on facing of right front.
FINISHED! Bring a touch of 60s design into your wardrobe with this asymmetric cropped jacket with the contrast color buttons in a horn look. The generous sleeves are drawn in at the hem with darts for a cool boule effect.