
When it comes to tailoring blazers or structured jackets, sleeve details often reflect the level of craftsmanship. The two-seam sleeve with placket is a subtle but sophisticated feature that brings both function and elegance to your garment. Whether you’re sewing a working vent or a decorative one, mastering this element will elevate the finish of your piece.
Let’s walk through the process.
✄ - - - - - - - - - - - - - - - - - - - - - - - - - - - - - - - - - - - - - - -- - - - - -
The Tailored Sleeve Vent With a Buttonhole
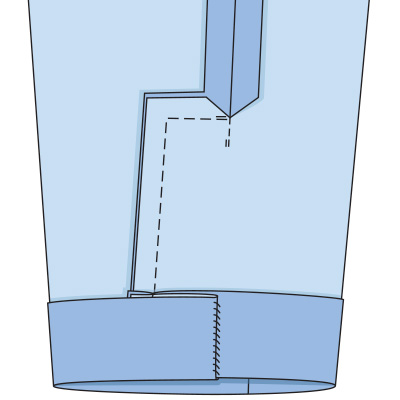
This placket is added to blazers and suit jackets. There are two options: the ‘classic’, in which a real placket is added and the ‘fake’, where the placket is only a decorative detail. The classic sleeve placket is open at the bottom sleeve edge.
The facing is on the pattern piece for the top sleeve and the underlap with facing is integrated into the pattern piece of the bottom sleeve.
To make this, all you have to do is follow these simple steps:
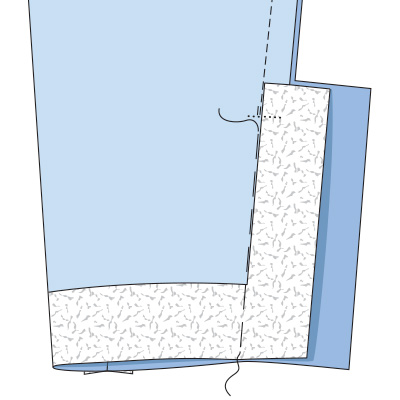
1. First stitch the front sleeve seam on the sleeve. Press the seam allowance apart. Iron interfacing onto the bottom sleeve edge (hem) and the facings.
Baste the back sleeve seam and baste the placket closed as a seam. Stitch from the top to the placket notch. Secure the seam ends. Leave the basting in the placket.
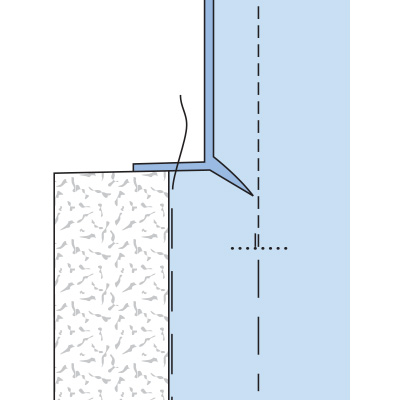
2. Clip the seam allowance of the bottom sleeve in the corners on an angle up to the line of stitching.
3. Press the seam allowances apart from the top to the clip. Press the allowances at the placket towards the top sleeve. Fold and press the facing on the underlap.
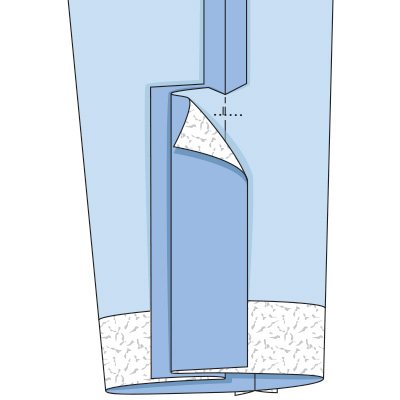
4. Unpick the basting at the placket. Stitch the sleeve ends, making mitred corners on the placket edges.
On the top placket end, stitch the underlap to the facing of the top sleeve. Sew on the buttons, catching the underlap.
Important: If you plan to use buttonholes, sew them to the top sleeve before stitching the placket end of the underlap to the facing. The facing must be wide enough to be caught when the buttonholes are sewn. Make bound buttonholes before stitching the back sleeve seam.
The Faux (or Decorative) Tailored Sleeve Vent
The ‘fake’ sleeve placket is closed at the bottom sleeve edge. The facing is integrated into the top sleeve and the underlap into the bottom sleeve.

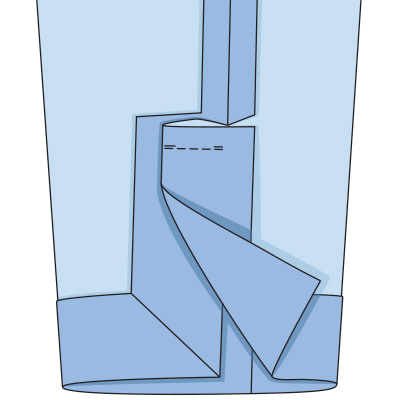
1. Baste the back sleeve seam, basting the placket closed as a seam. Stitch the sleeve seam from the top to the placket notch. Secure the seam ends. Do not remove the basting stitches. Stitch the top and side edges of the underlap and the facing. Clip the allowance of the bottom sleeve in the corners up to the line of stitching.
2. Press the allowances apart from the top to the clip. Press the allowance at the placket into the top sleeve. Stitch the front sleeve seam. Press the seam allowances apart. Stitch the hem. Unpick the basting at the placket. Stitch the placket edge to the hem. Sew on the buttons, catching the underlap.
Tip: The one-sided placket as explained for the classic sleeve placket is used on skirts, jackets, and coats.
By taking the time to follow each step with care and focusing on crisp, clean finishes, you’ll achieve a placket that mirrors the precision of professional tailoring. A well-executed sleeve vent doesn’t just serve a purpose, it also tells a story of skill, structure, and style.
And to find all the sewing basics and beginner-friendly patterns in one single book:
