Score a new favorite – fast and easy! Just follow our step-by-step instructions here to make yourself this loungewear classic piece in fun jersey...
STEP 1: CUT OUT THE FABRIC

Fold the fabric in half lengthwise, right side facing in. Pin paper pattern pieces 1 to 9 to the fabric as shown in the pattern layout, placing piece 2 at the fabric fold. Use the hand gauge and tailor's chalk to mark 1.5 cm (5/8") seam allowances on the fabric. Mirror piece 5 at centre back and mark the second half. Mark pieces a and b which cut to measure directly on the fabric. For piece b, you need only half the length from the fabric fold. Cut out the pieces on the marked lines.
STEP 2: CUT OUT THE INTERFACING

Fold the interfacing in half, adhesive side facing in. Pin piece 5 at the fold. Use pencil to mark 1.5 cm (5/8") seam allowances at the edges. Cut out the piece and iron on the wrong side of one collar piece (= outside collar piece).
STEP 3: TRANSFER PATTERN MARKINGS

Fold the collar in half with right side facing in and pin on the pattern piece again. Use dressmaker's carbon paper and a tracing wheel to transfer the pattern outlines (seam and hem lines) and all other markings to the wrong side of the pieces. Follow the instructions included with the carbon paper.
STEP 4: NOTES ON WORKING WITH STRETCH FABRICS

To retain the elasticity of the fabric, stitch seams at a shallow zigzag setting or with a special stretch stitch. Neaten seam allowances with zigzag stitching or with overlock stitching.
STEP 5: SIDE SEAMS AND SHOULDER SEAMS

Lay fronts right sides together with back. Pin and stitch shoulder seams (seam number 1) and side seams (seam number 3). Neaten allowances and press open. Lay front waistband pieces right sides together with back waistband. Stitch side seams. Press seam allowances open. Neaten front jacket edges.
STEP 6: STITCH ON WAISTBAND

Fold waistband in half lengthwise with wrong side facing in, press fold edge. Then unfold waistband again. Stitch one lengthwise edge right sides together with lower edge of jacket, matching side seams. Lay waistband down, press seam allowances onto waistband. Neaten other lengthwise edge.
STEP 7: OUTSIDE COLLAR PIECE

Attach one eyelet each at x on ends of interfaced outside collar piece. Please follow the manufacturer's directions to attach the eyelets. Stitch outside collar piece right sides together with neck edge of jacket (seam number 2), matching markings on collar with shoulder seams of jacket. Press seam allowances onto collar.
STEP 8: sizes 40 – 44: shorten the zip

Measure front edge of jacket from marked upper collar line to pressed fold of waistband. Shorten the zip at the top to this length: Transfer the length to the zip tape. Use pliers to remove the stopper and surplus teeth. If your zip is made of metal, you can reattach the stoppers. The stoppers of a plastic zip cannot be reused. Sew thread bars of buttonhole thread across the top of the zip instead by hand.
STEP 9: STITCH ON THE ZIP

Separate the zip and baste each zip tape face down on the allowance of the front edges so that teeth of zip lie on front garment piece. Zip begins on pressed fold of waistband and ends on marked upper collar line. Turn top ends of zip tapes over to the outside. Use the zipper foot of your sewing machine to stitch the zip. Press seam allowances to inside and go on to press allowance on waistband to inside all in one.
STEP 10: FINISH COLLAR

Press allowance at front edges of non-interfaced collar to inside. Pin collar right sides together with stitched collar, stitch along upper edge. Trim seam allowances. Turn collar to inside, press edge. Neaten inside collar edge and pin over collar joining seam. Work from right side of garment to stitch in line of joining seam. For the casing, stitch 3 cm (11/4") wide parallel to edge of collar.
STEP 11: FINISH WAISTBAND / TOPSTITCH FRONT EDGES

Fold waistband to inside on pressed crease. Pin inside waistband edge over waistband joining seam. Work from outside of garment to stitch in line of joining seam. Topstitch 7 mm (1/4") next to front jacket edges, catching inside collar edge and waistband edges.
STEP 12: SLEEVES

Stitch sleeve seams. Neaten allowances and press open. Stitch narrow edges of each sleeve band right sides together to form rounds. Press allowances open. Fold sleeve bands in half with wrong side facing in. Stitch sleevebands to lower sleeve edges, slightly stretched to fit. Neaten seam allowances together and press up.
STEP 13: SETTING IN SLEEVE

Pin sleeves into armholes with right sides facing. When setting in sleeves, the following points are important for proper fit: Match markings 5 on sleeve and front. Match marking at sleeve cap with shoulder seam. Ease sleeves slightly between the •. Match side seams and sleeve seams. Baste and stitch sleeves from sleeve side. Trim allowances and neaten together.
STEP 14: INSERT CORD

Wrap a piece of sticky tape around one end of cord and insert through casing along edge of collar. Remove the sticky tape. Wrap ends of cord tightly with thread or knot ends.
FINISHED!

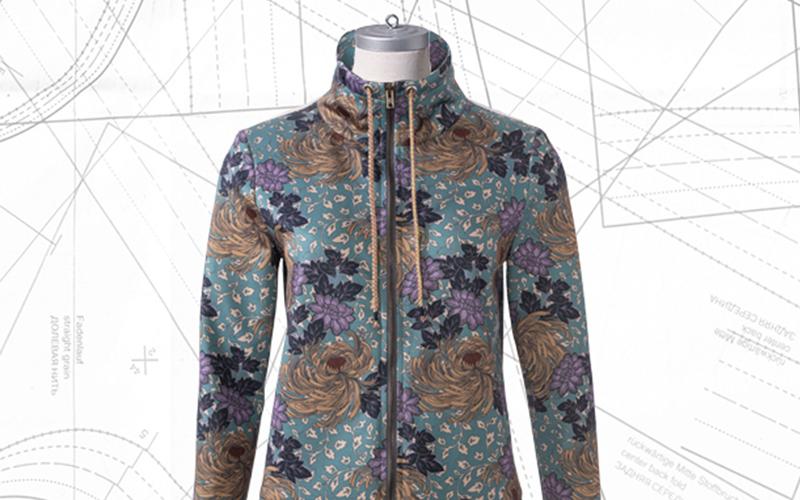
The jacket shows that flowers can also be sporty. A jacket with a high drawstring collar and a visible metal zip fastener.