
Whether you're a fan of city bike rides or long excursions into the wilderness, a good bike bag is a must-have for carrying your essentials. But what if you could make one yourself?
In this article, we'll take you step-by-step through the process of sewing a bike bag that's as functional as it is beautiful. And as a bonus? Thanks to its ingenious fasteners, this piece can be transformed into a trendy handbag in the blink of an eye! What a versatile accessory for all your adventures.
Supplies
- Waterproof fabric
- Cotton lining
- 25 cm zipper
- Strap, width 2.5 cm: 1.60 m
- Elastic bias, width 2 cm (finished width 1 cm): 0.30 m
- 2 semi-cicular rings, 2.5 cm wide
- 2 snap hooks, 3.8 cm wide
- 2 adjustment loops, 2.5 cm wide
- 1 sliding loop, 3.8 cm wide
Cutting Out
Cut the pattern pieces as follows. The 1 cm seam allowances are included in the pattern. You'll find the pattern and instructions in PDF format as a free download at the end of this article.
- Front: 1x in main fabric + 1x in lining
- Back: 1x in main fabric + 1x in lining
- Side piece: 2x in main fabric + 2x in lining
- Side pocket: 2x
Creation
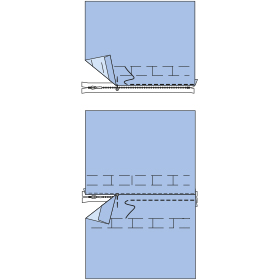
STEP 1
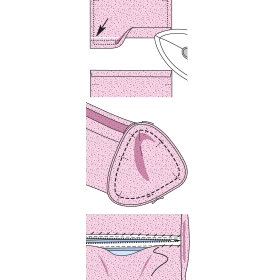
Press seam allowance at upper edge of back piece to inside. Pin zip centred under pressed edge and stitch close to edge, using the zipper foot of your sewing machine (1).
STEP 2
Cut 2 pieces of narrow webbing to fit width of pocket and pin to front and back as illustrated. Stitch to pocket pieces as marked. Backstitch to secure ends of stitching.
STEP 3
Lay bag pieces right sides together. Pin bottom seam and stitch. Press seam allowances open.
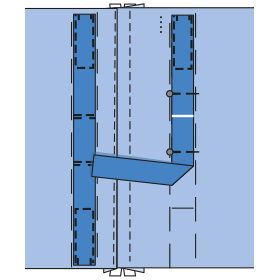
STEP 4
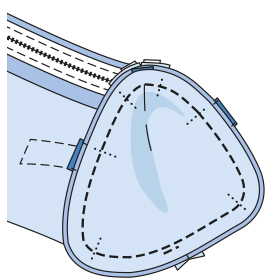
Bind upper edges of pockets (piece 4) with elastic trimming tape, cut to width of side piece and stretched to fi t (4). Baste pockets on side pieces with wrong side facing right side. Match upper edge of pocket with markings. Also match bottom marking(4a). Cut 2 pieces of narrow webbing each 5 cm (2 ins) long. Slip a D-ring to the middle of each and fold in half.
Baste ends together to make a loop and baste on upper edge of side pieces between markings (4b).
STEP 5
Stitch side pieces right sides together with front and back pieces (seam numbers 2, 3 and 4), catching in loops and side pockets.
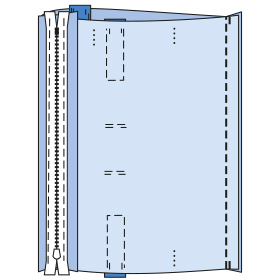
STEP 6
Press allowances at upper edges of front and back pieces to inside as follows: 5 mm (3/16 in) before facing fold line (arrow white line) on front, 5 mm (3/16 in) before marked upper edge on back. Stitch bottom seam. Press seam allowances open. Set in side pieces (seam numbers 2, 3 and 4), illus. 6a. Place lining inside bag with wrong sides facing, sew on at zip tapes by hand (6b).
STEP 7
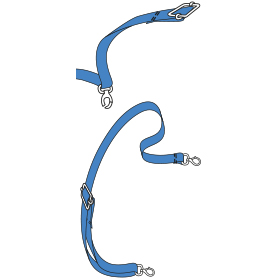
Lay one end of wide webbing about 5 cm (2 ins) long around middle bar of adjusting buckle, turn in edge and stitch in place. Lay webbing over bar of snap hook (7), then thread it into the adjusting buckle. Lay other end over bar of second snap-hook. Turn in end and stitch (7a).
STEP 8
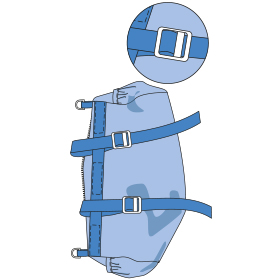
Cut remainder of narrow webbing into two equal pieces. Lay one end each into bottom middle bar of clamping buckle, turn in and stitch. Place straps with buckle each into an opening on back to each side of the middle. Use the straps to attach the bag to the handlebars.
It's finished!

And now you know how to make this innovative and stylish bicycle bag, which you can take anywhere as it adapts to your needs! Feel free to personalize your bag with fabrics, colors, and finishes that reflect your style.
And if you would like to find the instructions for this DIY in PDF formant or want to print this DIY to make later, do not hesitate to download it for free by clicking on the button below:
