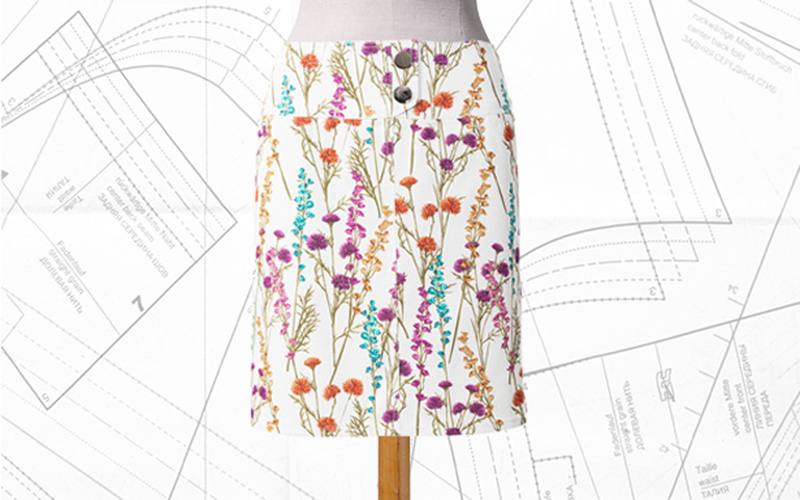
Refer to the "pattern’s store page" for specific fabric yardage and notion requirements. Also remember to add seam allowance (you can either add to the paper pattern before cutting or to the fabric around the pattern… see below), further info and amounts can be found in the instructions PDF after purchase.


STEP 1: CUT OUT THE FABRIC PIECES Fold the fabric in half lengthwise, right side facing in and matching the selvages. Pin paper pattern pieces to the fabric as shown in the pattern layout. Use chalk to mark 1.5 cm (5/8") seam and hem allowances round all edges of the pieces. Cut out the pieces on these lines.

STEP 2: THE INTERFACING Fold the interfacing in half, adhesive side facing in. Pin on pieces 25, 26 and 27. Add 1.5 cm (5/8") seam allowance at edges. Cut out the pieces. Also cut strips of interfacing 3 cm (11/4") wide equal to length of pocket opening edges. Iron interfacing on wrong side of respective fabric pieces (= outside yoke pieces and band). Iron 3 cm (11/4") wide strips on pocket opening edge of front skirt panels. Lay pieces with interfacing right sides together again and pin on the paper pattern pieces.

STEP 3: TRANSFER PATTERN MARKINGS Use dressmaker's carbon paper and a tracing wheel to transfer the pattern outlines (seam and hem lines) and all other lines, notches and the slit mark to the wrong side of the pieces. Follow the instructions included with the carbon paper. Use basting thread to mark abutting lines on the right fabric side of the hip yoke.

STEP 4: HIP YOKE POCKETS Pin pocket pieces right sides together with pocket opening edge of front skirt panels (seam number 1) and stitch. Trim allowances. Turn pocket pieces to inside. Baste edges, press. Use button-hole thread to topstitch close to pocket opening edges and again 7 mm (1/4") next to edges at a long stitch setting.

STEP 5: STITCH POCKET PIECES TOGETHER Pin front skirt panel to hip yoke so that pocket opening edge meets with marked placement line. Pin pocket pieces together. Stitch edges together. Neaten seam allowances together. Baste pocket pieces at side and upper skirt edges.

STEP 6: CENTER FRONT SEAM Lay front skirt panels right sides together. Pin center seam and stitch. Neaten allowances together and press onto right skirt panel. Work from right fabric side to topstitch close to centre seam and again 7 mm (1/4") next to seam, catching allowances.
STEP 7: FRONT BAND / FRONT YOKE Pin band pieces right sides together. Stitch edges together as illustrated. Trim allowances, trim corners at an angle. Turn band, press. Topstitch close to edges and again 7 mm (1/4") next to edges. Baste band on front edge of left front interfaced yoke.

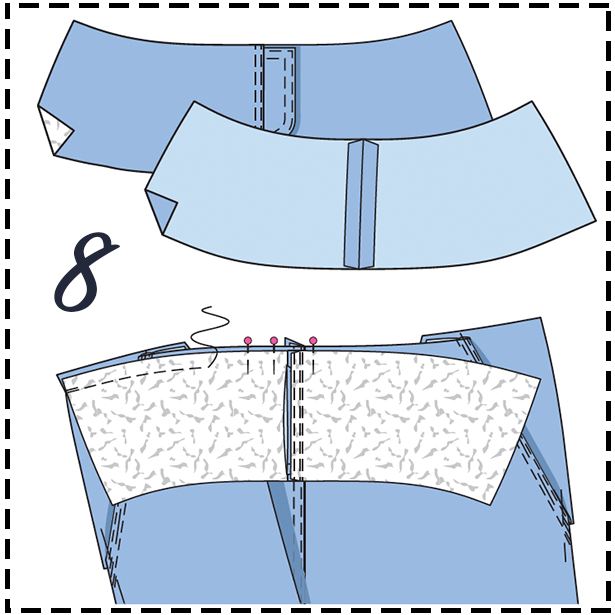
STEP 8: STITCH ON FRONT YOKE
Lay outside front yoke pieces right sides together, stitch centre seam. Press allowances onto right yoke. Topstitch close to seam and again 7 mm (1/4") next to seam. Stitch centre seam on inside front yoke. Press allowances open. Pin outside yoke right sides together with front skirt panel, matching centre seams. Stitch. Press allowances onto yoke.
STEP 9: STITCH ON BACK YOKES Pin outside back yokes right sides together with back skirt panels (seam number 3) and stitch. Press allowances onto yoke. Topstitch front and back yokes each from right side close to joining seam and again 7 mm (1/4") next to seam, interrupting stitching at front band. Pull thread ends to inside and conceal. Neaten back skirt edges.

STEP 10: INVISIBLE ZIP Open zip and pin face down on right fabric side of one back opening edge of skirt. Zip teeth must lie on marked seam line and zip tapes on the allowance. Zip teeth begin on seam line at upper skirt edge. Attach the special presser foot to your sewing machine. Stitch zip close to teeth. The teeth of an invisible zip roll inward and are held fl at for stitching by the special presser foot.
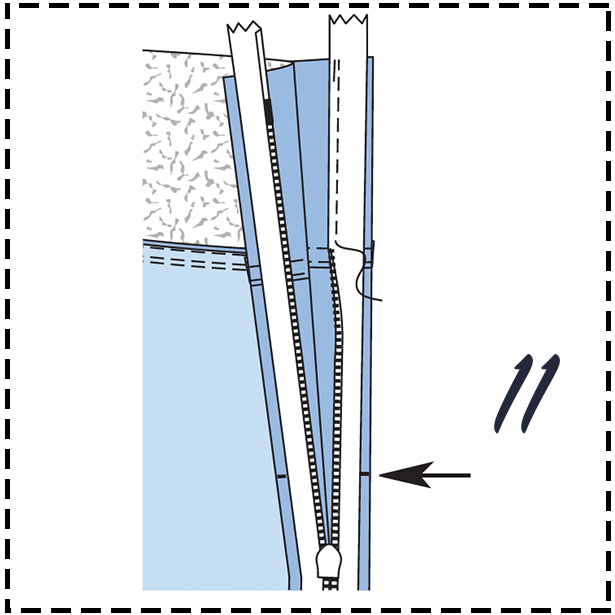
STEP 11: INVISIBLE ZIP Pin and stitch the other half of the zip to other edge of opening likewise. Stitch on both side from upper edges to slit mark.

STEP 12: CENTER BACK SEAM Lay back skirt panels right sides together. Pin centre seam. Stitch center seam from lower edges as far as possible to end of zip stitching line. Lay end of zip aside to stitch. Backstitch to secure ends of stitching. Press allowances open.

STEP 13: SIDE SEAMS Lay back skirt panel right sides together with front skirt panel. Pin side seams so that yoke joining seams match exactly. Stitch side seams. Neaten allowances and press open. Stitch side seams on non-interfaced yoke pieces (seam number 4). Trim allowances and press open. Neaten lower yoke edge.

STEP 14: DOUBLE THE YOKE Pin loose yoke right sides together with stitched yoke, matching side seams. Fold back edges out 5 mm (3/16") before opening edge, pin. Turn back skirt edges with zip tapes out, pin. Stitch upper edges together. Trim allowances.
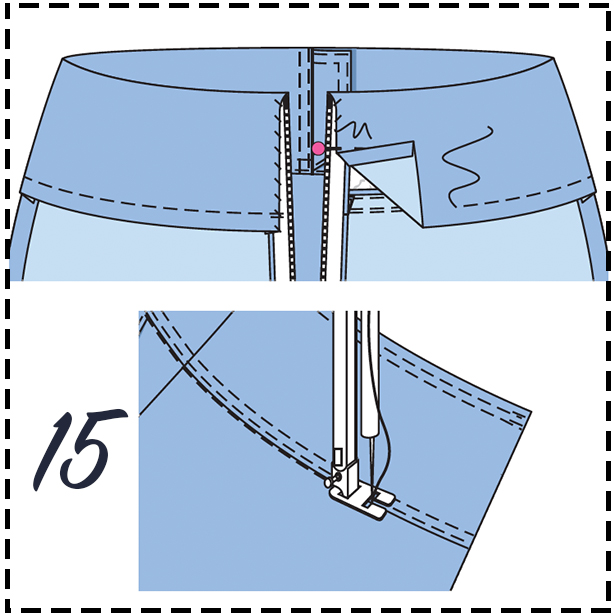
STEP 15: TOPSTITCH THE YOKE Turn yoke to inside. Press edges. Pin back edges to zip tapes and sew on by hand. Lay lower yoke edge over joining seam, pin. Work from outside of garment to stitch in line of yoke joining seam, catching inside yoke. Topstitch close to upper yoke edge and again 7 mm (1/4") next to edge, interrupting stitching at front band. Pull ends of thread to inside and conceal.

STEP 16: STITCH HEM Neaten lower skirt edge. Press hem allowance to inside, pin. Use buttonhole thread to topstitch lower edge 1 cm (3/8") wide, catching allowance.

STEP 17: SEW ON BUTTONS Sew two buttons to front band, passing needle through yoke on inside.

FINISHED! For a striking effect, use a solid color fabric for the yoke – it will look like a wide belt at the waist!
STEP 1: CUT OUT THE FABRIC PIECES Fold the fabric in half lengthwise, right side facing in and matching the selvages. Pin paper pattern pieces to the fabric as shown in the pattern layout. Use chalk to mark 1.5 cm (5/8") seam and hem allowances round all edges of the pieces. Cut out the pieces on these lines.
STEP 2: THE INTERFACING Fold the interfacing in half, adhesive side facing in. Pin on pieces 25, 26 and 27. Add 1.5 cm (5/8") seam allowance at edges. Cut out the pieces. Also cut strips of interfacing 3 cm (11/4") wide equal to length of pocket opening edges. Iron interfacing on wrong side of respective fabric pieces (= outside yoke pieces and band). Iron 3 cm (11/4") wide strips on pocket opening edge of front skirt panels. Lay pieces with interfacing right sides together again and pin on the paper pattern pieces.
STEP 3: TRANSFER PATTERN MARKINGS Use dressmaker's carbon paper and a tracing wheel to transfer the pattern outlines (seam and hem lines) and all other lines, notches and the slit mark to the wrong side of the pieces. Follow the instructions included with the carbon paper. Use basting thread to mark abutting lines on the right fabric side of the hip yoke.
STEP 4: HIP YOKE POCKETS Pin pocket pieces right sides together with pocket opening edge of front skirt panels (seam number 1) and stitch. Trim allowances. Turn pocket pieces to inside. Baste edges, press. Use button-hole thread to topstitch close to pocket opening edges and again 7 mm (1/4") next to edges at a long stitch setting.
STEP 5: STITCH POCKET PIECES TOGETHER Pin front skirt panel to hip yoke so that pocket opening edge meets with marked placement line. Pin pocket pieces together. Stitch edges together. Neaten seam allowances together. Baste pocket pieces at side and upper skirt edges.
STEP 6: CENTER FRONT SEAM Lay front skirt panels right sides together. Pin center seam and stitch. Neaten allowances together and press onto right skirt panel. Work from right fabric side to topstitch close to centre seam and again 7 mm (1/4") next to seam, catching allowances.
STEP 7: FRONT BAND / FRONT YOKE Pin band pieces right sides together. Stitch edges together as illustrated. Trim allowances, trim corners at an angle. Turn band, press. Topstitch close to edges and again 7 mm (1/4") next to edges. Baste band on front edge of left front interfaced yoke.
STEP 8: STITCH ON FRONT YOKE
Lay outside front yoke pieces right sides together, stitch centre seam. Press allowances onto right yoke. Topstitch close to seam and again 7 mm (1/4") next to seam. Stitch centre seam on inside front yoke. Press allowances open. Pin outside yoke right sides together with front skirt panel, matching centre seams. Stitch. Press allowances onto yoke.
STEP 9: STITCH ON BACK YOKES Pin outside back yokes right sides together with back skirt panels (seam number 3) and stitch. Press allowances onto yoke. Topstitch front and back yokes each from right side close to joining seam and again 7 mm (1/4") next to seam, interrupting stitching at front band. Pull thread ends to inside and conceal. Neaten back skirt edges.
STEP 10: INVISIBLE ZIP Open zip and pin face down on right fabric side of one back opening edge of skirt. Zip teeth must lie on marked seam line and zip tapes on the allowance. Zip teeth begin on seam line at upper skirt edge. Attach the special presser foot to your sewing machine. Stitch zip close to teeth. The teeth of an invisible zip roll inward and are held fl at for stitching by the special presser foot.
STEP 11: INVISIBLE ZIP Pin and stitch the other half of the zip to other edge of opening likewise. Stitch on both side from upper edges to slit mark.
STEP 12: CENTER BACK SEAM Lay back skirt panels right sides together. Pin centre seam. Stitch center seam from lower edges as far as possible to end of zip stitching line. Lay end of zip aside to stitch. Backstitch to secure ends of stitching. Press allowances open.
STEP 13: SIDE SEAMS Lay back skirt panel right sides together with front skirt panel. Pin side seams so that yoke joining seams match exactly. Stitch side seams. Neaten allowances and press open. Stitch side seams on non-interfaced yoke pieces (seam number 4). Trim allowances and press open. Neaten lower yoke edge.
STEP 14: DOUBLE THE YOKE Pin loose yoke right sides together with stitched yoke, matching side seams. Fold back edges out 5 mm (3/16") before opening edge, pin. Turn back skirt edges with zip tapes out, pin. Stitch upper edges together. Trim allowances.
STEP 15: TOPSTITCH THE YOKE Turn yoke to inside. Press edges. Pin back edges to zip tapes and sew on by hand. Lay lower yoke edge over joining seam, pin. Work from outside of garment to stitch in line of yoke joining seam, catching inside yoke. Topstitch close to upper yoke edge and again 7 mm (1/4") next to edge, interrupting stitching at front band. Pull ends of thread to inside and conceal.
STEP 16: STITCH HEM Neaten lower skirt edge. Press hem allowance to inside, pin. Use buttonhole thread to topstitch lower edge 1 cm (3/8") wide, catching allowance.
STEP 17: SEW ON BUTTONS Sew two buttons to front band, passing needle through yoke on inside.
FINISHED! For a striking effect, use a solid color fabric for the yoke – it will look like a wide belt at the waist!