
Images: © Bodo Rickassel & © Jan Schmiedel
MATERIALS: + Nylon fabrics + Cord + Thread + "1 Cord stopper" + Pins + Chalk + Hand sewing needle + Scissors + Tape measure + Paper and pencil + "Clips" + Ruler
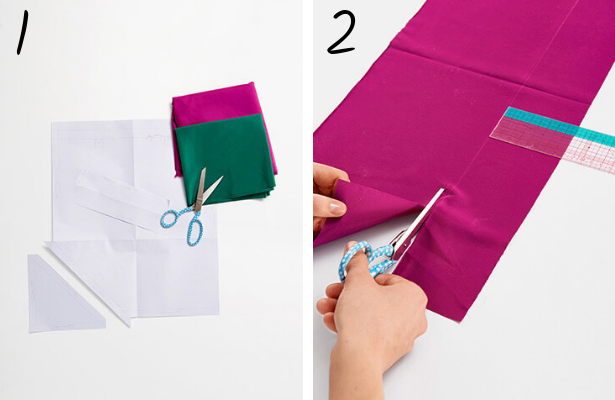
Step 1: Draft the pattern pieces. Pocket part: 37 cm wide x 44 cm high (already including seam allowances). Cut corner at 17 cm corner and mark 1.5 cm seam allowance all around. To the triangle also add 1.5 cm seam allowance. Step 2: Cut 2 of the pocket pieces (without corner, measurements from step 1), and cut 2 of the carrier pieces (76 x 8 cm), and also cut 2 of the corner cut out of outer nylon fabric.
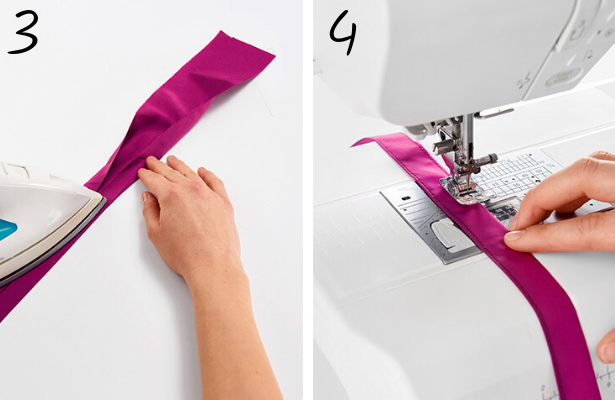
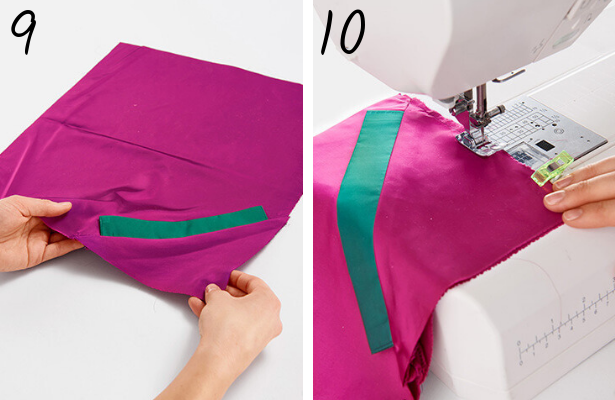
Step 3: Iron both straps 2 cm to the middle on both sides. Then press in half again so pressed edge meet (finished width 2 cm). Step 4: Both shoulder straps are stitched on both sides in a narrow edged seam.

Step 5: Cut 4 rectangles from green fabric each 21.6 x 8 cm. Then place two of the pieces wrong sides together and stitch the side seams at 1 cm. Step 6: Turn to the right side and stitch the side seams on each side with a narrow stitch.

Step 7: Iron strips in half to 4 cm width and pin in the middle of each triangle. Step 8: Clip the pocket pieces to the triangle sandwiching the green tunnel and stitch together at 1.5 cm.
Step 9: The green tunnel (2.5 cm visible) is now sewn on both pockets in the corner. Rip out the seam in-between the two green tunnel edges on the inside and sew them over individually with an overlock stitch creating an opening. Step 10: Put both bag parts wrong sides together and stitch the bottom closed at 0.5 cm. Open the seam, turn it over and sew it from the wrong side at 1 cm (lapped seam).
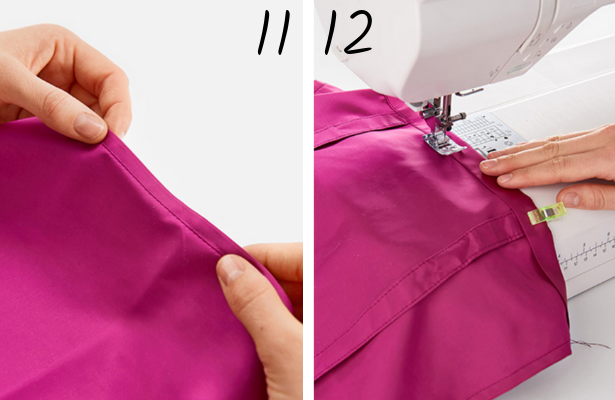
Step 11: Repeat on the two side seams: Stitching, pressing and turning wrong sides together stitching at 0.5 cm. Stitch again at 1 cm. Step 12: Press in the upper edge of the bag 2 cm twice towards the wrong side of the top bag. Also position the straps about 10 cm from the side seam. Stitch all around with a narrow seam.
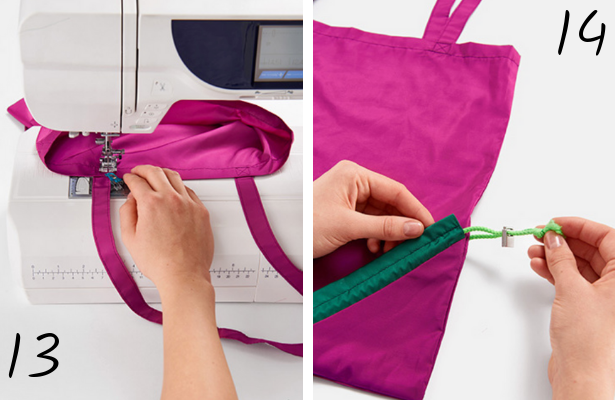
Step 13: Flip up the strap pieces and sew the edges all around in the middle like an X shape at all four strap ends for extra support. Step 14: Finally stitch the two green tunnels on either side of the bag at 1 cm each from the fold. Then pull the drawstring through the lower tunnel of each, attach the cord stopper, and knot.

Through the opening you can stuff the bag and pull the cord stopper tight to create a little pouch for your shopping bag! It's now ready to pop into your purse ready for your next shopping trip. Happy DIYing!
MATERIALS: + Nylon fabrics + Cord + Thread + "1 Cord stopper" + Pins + Chalk + Hand sewing needle + Scissors + Tape measure + Paper and pencil + "Clips" + Ruler
Step 1: Draft the pattern pieces. Pocket part: 37 cm wide x 44 cm high (already including seam allowances). Cut corner at 17 cm corner and mark 1.5 cm seam allowance all around. To the triangle also add 1.5 cm seam allowance. Step 2: Cut 2 of the pocket pieces (without corner, measurements from step 1), and cut 2 of the carrier pieces (76 x 8 cm), and also cut 2 of the corner cut out of outer nylon fabric.
Step 3: Iron both straps 2 cm to the middle on both sides. Then press in half again so pressed edge meet (finished width 2 cm). Step 4: Both shoulder straps are stitched on both sides in a narrow edged seam.
Step 5: Cut 4 rectangles from green fabric each 21.6 x 8 cm. Then place two of the pieces wrong sides together and stitch the side seams at 1 cm. Step 6: Turn to the right side and stitch the side seams on each side with a narrow stitch.
Step 7: Iron strips in half to 4 cm width and pin in the middle of each triangle. Step 8: Clip the pocket pieces to the triangle sandwiching the green tunnel and stitch together at 1.5 cm.
Step 9: The green tunnel (2.5 cm visible) is now sewn on both pockets in the corner. Rip out the seam in-between the two green tunnel edges on the inside and sew them over individually with an overlock stitch creating an opening. Step 10: Put both bag parts wrong sides together and stitch the bottom closed at 0.5 cm. Open the seam, turn it over and sew it from the wrong side at 1 cm (lapped seam).
Step 11: Repeat on the two side seams: Stitching, pressing and turning wrong sides together stitching at 0.5 cm. Stitch again at 1 cm. Step 12: Press in the upper edge of the bag 2 cm twice towards the wrong side of the top bag. Also position the straps about 10 cm from the side seam. Stitch all around with a narrow seam.
Step 13: Flip up the strap pieces and sew the edges all around in the middle like an X shape at all four strap ends for extra support. Step 14: Finally stitch the two green tunnels on either side of the bag at 1 cm each from the fold. Then pull the drawstring through the lower tunnel of each, attach the cord stopper, and knot.
Through the opening you can stuff the bag and pull the cord stopper tight to create a little pouch for your shopping bag! It's now ready to pop into your purse ready for your next shopping trip. Happy DIYing!