A timeless fashion icon, the pleated skirt embodies the perfect balance between technical precision and airy elegance. Behind its graceful folds lies a world of calculation: width, depth, panels,
and proportions align with accuracy to achieve a fluid drape. As pleated skirts make their strong comeback—from the runway to everyday wear—mastering their construction means blending craftsmanship with contemporary style.
✄ - - - - - - - - - - - - - - - - - - - - - - - - - - - - - - - - - - - - - - -- - - - - -
Pleated Skirt
With some mental acrobatics, you can make a pleated skirt without a pattern. You’ll need three measurements: hips, waist, and skirt length. To ensure that the skirt is not too tight, add a comfort allowance of 4 cm (1 5/8 in) to the hips and 2 cm (3/4 in) to the waist.
Calculating the Pleats
The basic measurement for the calculation is the hips.
Hip plus allowance divided by the pleat width equals the number of pleats, or, if the calculation doesn’t work out: the hip plus allowance divided by the number of pleats equals the pleat width.
Examples:
Hip measurement 92 cm + 4 cm (36 1/8 + 1 5/8 in)
Allowance = 96 cm (37 7/8 in).
- 96 cm (37 7/8 in) hips: 6 cm (2 3/8 in) pleat fold = 16 pleats
- 96 cm (37 7/8 in) hips: 8 cm (3 1/4 in) pleat fold = 12 pleats
- 96 cm (37 7/8 in) hips: 10 cm (4 in) pleat fold = 9.6 pleats
As you cannot make 9.6 pleats, you must calculate in reverse: 96 cm (37 7/8 in) hips: 10 pleats = 9.6 cm (3 3/4 in) pleat width.
As you cannot make 9.6 pleats, you must calculate in reverse: 96 cm (37 7/8 in) hips: 10 pleats = 9.6 cm (3 3/4 in) pleat width.
Fabric Requirements
The pleat depth is typically twice as wide as the pleat fold. In other words, irrespective of the pleat width and the number of pleats, for the total width you need the hip measurement + 4 cm (1 5/8 in) comfort allowance x 3. Based on a hip measurement of 96 cm (37 7/8 in) (4 cm (1 5/8 in) of which are the comfort allowance), the result is a total width of 288 cm (3 yd 5 in).
Depending on the fabric width, you must divide the total width into 2 or 3 skirt panels.
Important : To ensure that the joining seams of the skirt panels are at the centre of the pleat depths, the number of pleats must always be divisible by the number of skirt panels. For example, in the case of two skirt panels, by 2 and for three skirt panels, by 3.
Examples:
For a fabric width of 140 cm (55 1/8 in), you have a total width of 280 cm (3 yd 2 in) (= two skirt panels) available. In cases like this, you would have to purchase a third skirt panel due to the 8 cm (3 in) difference (with seam allowance, 12 cm (4 3/4 in)). That would be unfortunate. A better solution would be to subtract the missing centimetres (inches) from the pleat depth: 280 cm (3 yd 2 in) total width - 96 cm (37 7/8 in) hip measurement (4 cm (1 5/8 in) of which are the comfort allowance) - 4 cm (1 5/8 in) seam allowance = 180 cm (70 7/8 in). This amount divided by the number of pleats equals the pleat depth. 180 cm (70 7/8 in): 16 pleats = 11.25 cm (4 7/16 in) pleat depth.
For a fabric width of 90 cm (35 1/2 in), the calculation is the same: 3 skirt panels equals a total width of 270 cm (2 yd 34 3/8 in). As 16 pleats is not divisible by the 3 that you need to use for 3 skirt panels, you must change the number of pleats to a number that is divisible by 3. Recalculate the pleat width and pleat depth. Pleat width = hip measurement 96 cm (37 7/8 in): 15 pleats = 6.4 cm (2.5 in). Pleat depth = total width minus the hips and seam allowance (for 3 skirt panels, 6 cm (2 3/8 in)) divided by the number of pleats: 270 cm - 96 cm - 6 cm = 168 cm (2 yd 34 3/8 in - 37 7/8 in - 2 1/2 in = 66 1/8 in): 15 pleats = 11.2 cm (4 7/16 in).
Important: When purchasing the fabric, remember to add the seam and hem allowances, and do not forget the waistband.
Calculating the Waist
The difference between the waist and hip measurements is evenly distributed among the pleats. In other words, it is subtracted from the pleat width and added to the pleat depth.
Exemple: Hip 96 cm (37 7/8 in) and waist 64 cm (25 1/4 in) yields a difference of 32 cm (12 5/8 in). For 16 pleats, that equals 2 cm (3/4 in) per pleat. The pleat width is no longer 6 cm (2 3/8 in), but instead is 4 cm (1 5/8 in). The pleat depth is not 11.25 cm (4 1/2 in) but instead 13.25 cm (5 1/4 in).
*The measurements in inches in these examples are good approximations for purposes of illustration only.
Cutting Out the Skirt Panels
Measure the skirt length plus the seam and hem allowances along a selvedge, and cut through the fabric at a 90° angle from the closest selvedge to the other selvedge. Repeat for the second (and third) skirt panel(s). Stitch the hem on the skirt panels.
Drawing the Pleats on the Skirt Panels
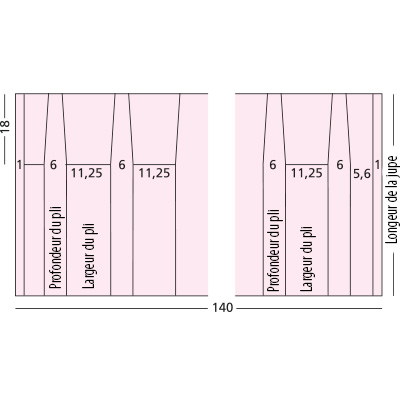
Place the skirt panels on the table with the wrong side face up. Use tailor’s chalk or basting thread to mark the hip line. To do so, measure the hip depth (approx. 18 cm (7 in)) from the top edge plus 1 cm (3/8 in) seam allowance for the waistband joining seam. Draw the pleats, beginning with 1/2 pleat depth plus the seam allowance. Next, draw the pleat width alternating with the pleat depth and end with 1/2 pleat depth plus seam allowance (the drawing below shows a skirt panel for 140 cm (55 1/8 in) fabric width and 16 pleats)
Stitching the Skirt Panels Together
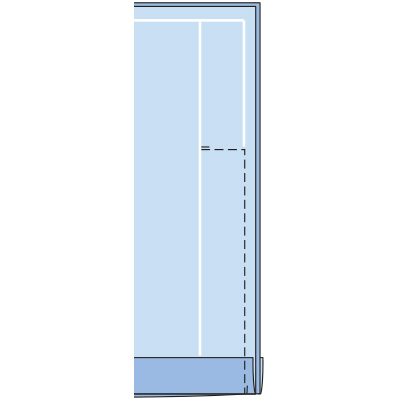
Baste and press the pleats. Pin the skirt panels right sides together. Stitch the seams. For the zip fastener, stitch only from the hem to the hip line and then at a 90° angle to the pleat placement line. Neaten the seam allowances.
To ensure that the skirt drapes nicely, cut the waist edge at centre front and back 1.5 cm (5/8 in) deeper, tapering out to the sides. Baste the waistband to the waist edge and try on the skirt. If the skirt is not the same length everywhere, cut the top skirt edge deeper. If cutting the skirt at the top edge has made it somewhat too wide, add the extra width to the pleat depth.
Inserting the Zipper
Insert the zip fastener at the slit such that it is concealed on one side (lapped). Clip the pleat depth of the back slit edge up to 1/2 cm (1/4 in) away from the marked pleat placement line. Fold and baste the pleat depth to the inside, 1/2 cm (1/4 in) away from the marked pleat line. Press.
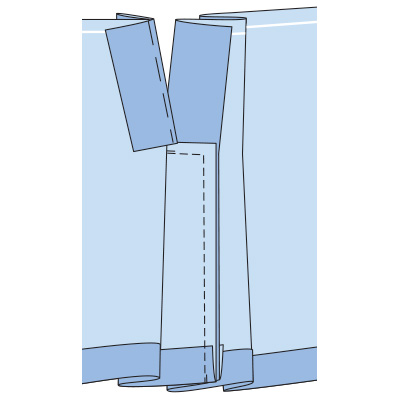
Baste the zip close to the teeth below the slit edge, stitch close to the edge.
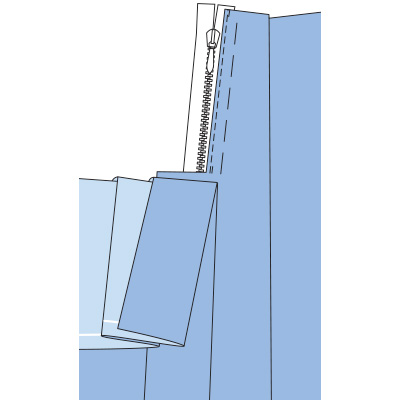
On the other slit edge, baste the pleat to the zip such that the pleat fold meets the pleat placement line. Stitch the second half of the zip. At the slit end, stitch on an angle. Attach the waistband.
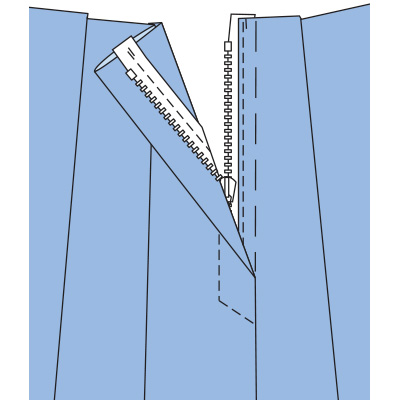
By carefully balancing measurements and adjusting pleat width and depth, the pleated skirt becomes an exercise in precision. The key lies in evenly distributing the difference between hips and waist, ensuring a smooth drape without excess volume. This technical mastery results in a skirt that is both comfortable and refined, perfectly aligned with today’s trend for structured silhouettes.
And to find all the sewing basics and beginner-friendly patterns in one single book: