Clever details make this white blouse really stylish: This pattern is a true fashion highlight! Did we mention it can be easily sewn too? Just follow the sewing lesson below to follow step by step...
STEP 1: CUT OUT THE FABRIC PIECES

Pin the pieces to the fabric as shown in the pattern layout, placing piece 2 at the fabric fold. Use the hand gauge and tailor's chalk to mark 1.5 cm (5/8 in) seam and hem allowance at the edges of the paper pattern pieces. Cut out the pieces on these lines. Cut piece 6 last with 1.5 cm (5/8 in) allowance from a single layer of remaining fabric
STEP 2: THE INTERFACING

Fold the interfacing, adhesive side facing in. Pin on piece 5 as illustrated. Use the pencil and ruler to mark 1.5 cm (5/8 in) seam allowance at the edges of the paper pattern piece. Cut out the pieces and iron on the wrong fabric side of the bands. Lay bands right sides together again. Pin on the pattern piece again
STEP 3: TRANSFER PATTERN MARKINGS

Use dressmaker's carbon paper and a tracing wheel to transfer the pattern outlines (seam and hem lines) and all other markings to the wrong side of the fabric pieces. Follow the instructions included with the carbon paper. Use basting thread to transfer fold lines on sleeves to right side of fabric.
STEP 4: BUST DARTS

Fold front pieces, right side facing in. Pin dart lines together and stitch toward points. Knot threads. Press darts down.
STEP 5: STITCH YOKE (DOUBLED) TO BACK PIECE
 TO BACK PIECE")
Pin one yoke piece right sides together with back (seam number 1). Pin other yoke piece on inside of back with right side facing wrong side. Stitch on yokes. Trim allowances. Press yokes over joining seam. Press allowance at shoulder edges of inside yoke to inside.
STEP 6: STITCH YOKE TO FRONT PIECES

Pin outside yoke right sides together with front pieces (seam number 2) and stitch. Trim allowanc-es and press onto yoke. Baste inside yoke along joining seams and sew on by hand.
STEP 7: SIDE SEAMS / HEM

Lay fronts right sides together with back, pin side seams (seam number 5) and stitch. Trim allowances to 7 mm (1/4 in), neaten together and press onto back. Press hem allowance to inside, turn in and pin. Stitch a narrow hem.
STEP 8: STITCH ON FRONT BANDS

Stitch bands right sides together with front pieces (seam number 3). Trim seam allowances and press onto bands. Press allowance at other long edge of bands to inside. Fold bands out on fold line, right side facing in. Stitch top and bottom edges together. Trim allowances. Clip allowance at edge of neckline close to last stitch of band joining seam (arrow).
STEP 9: TURN FRONT BANDS TO INSIDE

Turn bands. Press edges. Lay inside edge over joining seam and baste. Work from outside of garment to topstitch band close to joining seam, catching inside edge.
STEP 10: TIE COLLAR

Lay collar pieces right sides together. Stitch centre back seam. Press allowances open. Pin one edge of collar right sides together with edge of neckline (seam number 3), matching markings with band joining seams (clips). Stitch collar. Trim allowances, clip curves.
STEP 11: TIE COLLAR

Stitch edges of bands together as far as collar join-ing seam as illustrated. Trim allowances, trim cor-ners at an angle. Turn collar and bands, press. Turn in inside collar edge, pin at joining seam and sew on by hand.
STEP 12: SLEEVES WITH TUCKS

Fold sleeves each on marked fold line, wrong side facing in. Topstitch fold edge as marked. Press tucks toward back edge of sleeve. Fold sleeves lengthwise, right side facing in. Stitch sleeve seams. Trim seam allowances to 7 mm (1/4 in), neaten together and press to one side.
STEP 13: LOWER SLEEVE EDGE / ELASTIC CASING

Press allowance at lower sleeve edge to inside by 5 mm (3/16 in), then press to inside by 1 cm (3/8 in) and pin. Stitch allowance close to edge, leaving an opening to insert elastic. Cut elastic into 2 equal pieces and use a safety pin as a bodkin to insert. Sew ends of elastic together for a comfortable fit at the wrist. Sew up opening in seam.
STEP 14: SETTING IN SLEEVES

Pin sleeve into armhole with right sides facing. When setting in sleeves, the following points are important for proper fit: Match sleeve seams and side seams. Match markings 7 on sleeve and front. Match middle tuck with shoulder marking on yoke. Ease sleeve caps slightly between the •. Stitch sleeves. Trim seam allowances, neaten together and press toward sleeves at sleeve cap.
STEP 15: BUTTONHOLES / BUTTONS

The x for the buttonholes and buttons on piece 5 are marked for size 36. The bottom marking is the same for all sizes. Mark the top x for sizes 38 to 44 the same distance from upper edge as for size 36. Space the other 5 markings evenly in between. Transfer the x to the bands. Work buttonholes on right band lengthwise from x. Sew buttons on left band at x.
FINISHED!

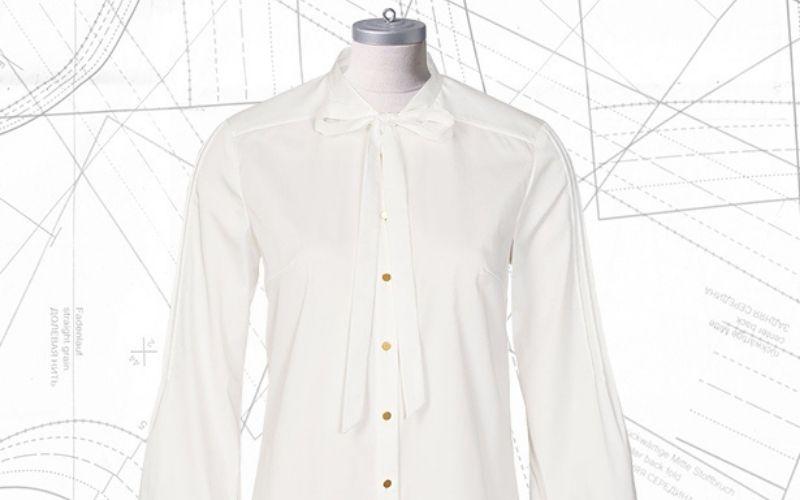
White blouse, but make it trendy! This pattern features trendy details like the narrow bow collar, tucks on the sleeves and small gold buttons. Get the pattern right now!