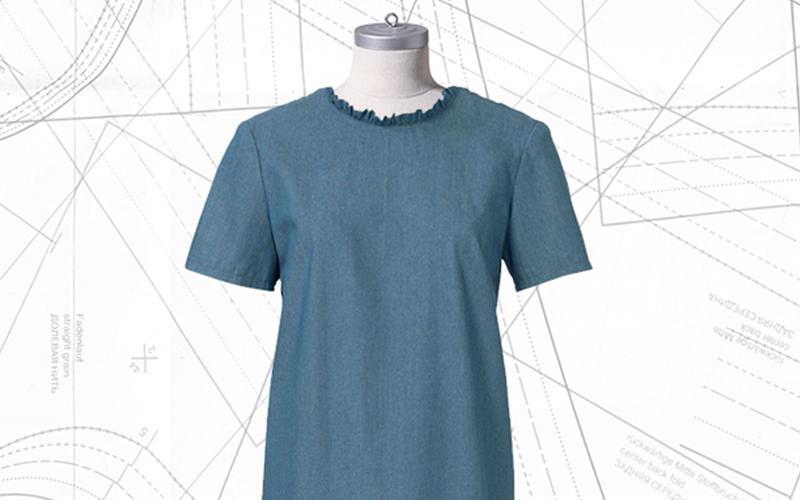
Sporty fabric teams up with feminine details – and these easy step-by-step instructions core a new favorite – fast and easy! Just follow our step-by-step instructions here to make yourself this fun dress...
STEP 1: CUT OUT THE FABRIC

Fold the fabric in half, right side facing in. Pin the pieces to the fabric as shown in the pattern layout. Use tailor's chalk to mark 1.5 cm (5/8") seam allowances on the fabric round the edges of the pieces. Cut out the pieces on these lines.
STEP 2: TRANSFER PATTERN MARKINGS

Use dress maker's carbon paper and a tracing wheel to transfer pattern outlines (seam and hem lines) and all other markings to the wrong side of the pieces. Follow the instructions included with the carbon paper. Tip: Iron a small bit of interfacing on back pieces at corners of neckline to prevent tearing (where fabric will be clipped later, see step 7).
STEP 3: BUST DARTS

Fold front so that dart lines meet, right fabric side facing in. Pin darts and stitch toward points of darts. Knot threads at points of darts. Press darts down.
STEP 4:CENTER BACK SEAM

Lay back pieces right sides together. Baste centre seam from upper to lower edges, also basting pleat. Stitch seam from upper edges to slit mark (arrow). Backstitch to secure ends of stitching. Press allowances open, baste at upper edge.
STEP 5: SHOULDER SEAMS

Lay front sides together with back. Pin shoulder seams (seam number 1) and stitch, easing back shoulder edges. Neaten allowances and press open.
STEP 6: GATHER FRILL

Press frill piece half lengthwise, wrong side facing in. Gather open edges together by stitching two closely spaced lines of machine basting (stitch length 4 mm / a good 1/8") spaced 1.2 cm (1/2") next to edge and again 7 mm (1/4") next to this. Pull bobbin threads to fit edge to edge of neckline. Knot threads. Distribute gathers evenly. Use a straight pin to mark centre of frill and centre front of neckline.
STEP 7: STITCH ON FRILL

Pin frill right sides together with neckline, matching centres and with ends overhanging by 1.5 cm (5/8") in back at end of neckline. Stitch frill between lines of gathering from corner to corner (seam number 2). Backstitch to secure ends of stitching. Clip fabric of back in corners close to line of stitching (arrows).
STEP 8: STITCH ON ENDS OF FRILL

Overlap narrow ends of frill and pin together for a finished width of 3 cm (1 1/4") plus 1.5 cm (5/8") seam allowance each. Pin frill right sides together with back and stitch from clipping to clipping. Backstitch to secure ends of stitching. Trim allowances, also at neckline, neaten together and press onto dress. Topstitch along edge of dress neckline close to joining seam of frill. Remove any visible gathering threads from right side.
STEP 9: SIDE SEAMS

Lay front right sides together with back. Pin side seams (seam number 4) and stitch. Neaten allowances and press open.
STEP 10: STITCH HEM

Undo basting at bottom of back pleat by about 10 cm (4"). Neaten hem allowance, press to inside and pin. Topstitch lower edge of dress 1 cm (3/8") wide, catching hem. Baste pleat closed again. Stitch hem on pleat underlay likewise.
STEP 11: STITCH ON PLEAT UNDERLAY

Press allowance at upper edge of pleat underlay piece to inside. Pin pleat underlay right sides together with pleat folds, matching upper edge with joining seam of frill (arrow). Pin pleat seams together (seam number 3) and stitch. Backstitch to secure ends of stitching. Neaten allowances together. Sew on upper edge of pleat underlay at frill joining seam by hand.
STEP 12: SLEEVES

Stitch sleeve seams (seam number 5). Neaten allowances and press open. Stitch sleeve hem as instructed in step 10. Pin sleeves into armholes. When setting in sleeves the following points are important for proper fit: Match markings 6 on sleeve and front. Match sleeve seams with side seams. Match marking at sleeve cap with shoulder seam. Ease sleeve cap slightly between the •. Stitch sleeves. Neaten allowances together and press toward sleeves at sleeve cap.
FINISHED!

Proof that dresses made from denim can also be feminine – thanks to the frill that dec-orates the (back) neckline and a deep back pleat that adds movement to the model.