Photos: © Mirjam Fruscella
MATERIALS: + Cotton 140 cm 35 cm / or cotton 90 cm 45 cm + Cotton as lining 65 cm 25 cm or cotton as lining 40 cm 35 cm + "Vliesofix" + 1 Zipper 14 cm + 1 Zipper 22 cm + Pre-folded cotton bias tape 130 cm + Metal buckle for 2.5 cm width + Belt adjuster for 2.5 cm belt width + Sewing thread + Pins + Scissors + Hand sewing needle + Tracing wheel and paper + Safety pin + Pattern

Step 1: Iron the parts made of Vliesofix (parts 1 and 2) onto the corresponding pieces of lining material (wrong side of fabric). Peel off the backing paper and iron the parts onto the appropriate pieces of fashion fabric (wrong side). Step 2: Put the inner pocket piece #3 right sides together above the marked zipper lines on the lower front to the larger pouch piece #2 so that the marked lines meet. On the pocket piece, stitch along the marked lines in the rectangle.
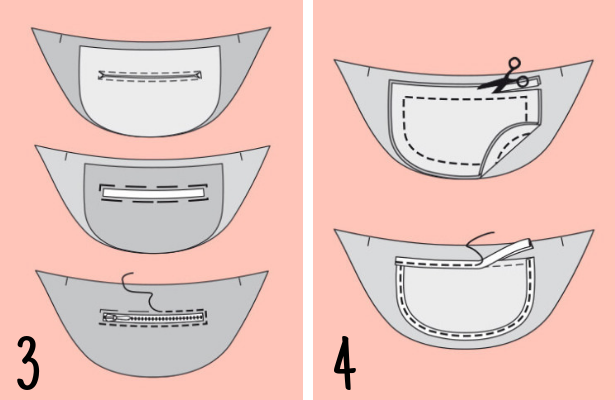
Step 3: Cut between the seams, and diagonally into the corners. Pull the pocket pouch piece in through the opening and pin. Also press around the rectangle. Pin the zipper under the opening with the teeth visible from the right side. Stitch around with a narrow stitch and foot on the machine. Step 4: Place the other pocket on the inside of the bag, and stitch the pocket pouch 1.5 cm away from the edge. Cut 1 cm of seam allowance all around and finish the edges with the pre-folded bias tape.
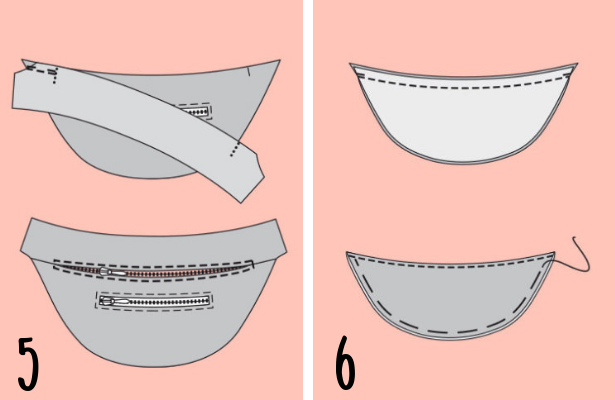
Step 5: Stitch the lower front pouch piece #2 at the side of the slit markings right sides together on the upper front pouch piece #1. Press the seam allowances open and continuously press the open edges inbetween the slit edges for the zipper. Pin the zipper under the slit pressed edges with the teeth remaining visible. Stitch around the zipper. Step 6: Pin the outer bag pieces #4 right sides together on top of each other and stitch along the straight seam. Turn the pieces wrong sides together and press the edge then finish with a stitching line. Pin or baste the open curved edges together.

Step 7: Pin/baste the outside pocket on the front so that the lower edges lie on each other. Step 8: Fold the belt pieces #6 & #7 lengthwise in half (wrongs side of the fabric on the outside) and stitch the long edges together. Turn the belts right side out with a safety pin, then press the edges and stitch around. Stitch the ends of each belt piece to the sides of the front the front.

Step 9: Open the zipper and put the back pocket piece #5 on the front pocket (wrong side of the fabric on the outside) and stitch all around. Finish the seam allowances with bias tape. Step 10: Turn the bag to the right side through the zipper opening, and press the edges. Topstitch on the bag along the seam where the belt pieces are stitched.

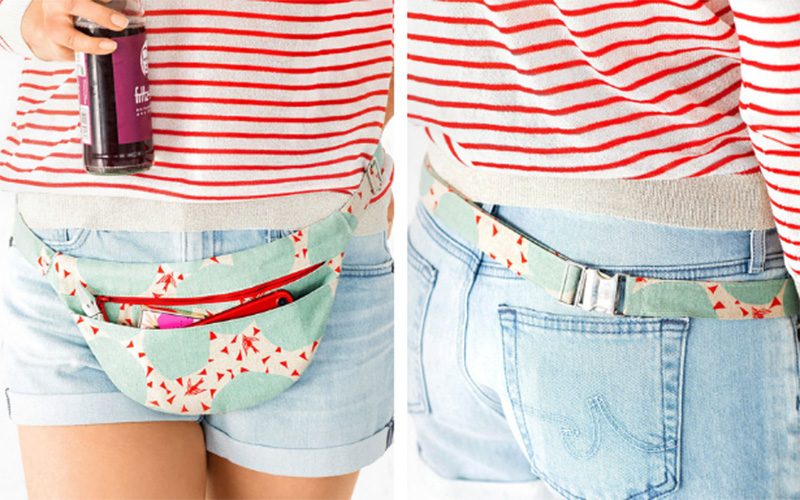
Step 11: Pull the long strap through the roller buckle, and then put it around the bridge of the clasp. Lead it back around the bridge of the roller buckle and stitch the end of the strap. Lay the end of the short strap around the other bridge and stitch. Finished! Fanny packs are perfect for the summer for bike rides, traveling, and walks around town.
MATERIALS: + Cotton 140 cm 35 cm / or cotton 90 cm 45 cm + Cotton as lining 65 cm 25 cm or cotton as lining 40 cm 35 cm + "Vliesofix" + 1 Zipper 14 cm + 1 Zipper 22 cm + Pre-folded cotton bias tape 130 cm + Metal buckle for 2.5 cm width + Belt adjuster for 2.5 cm belt width + Sewing thread + Pins + Scissors + Hand sewing needle + Tracing wheel and paper + Safety pin + Pattern
Step 1: Iron the parts made of Vliesofix (parts 1 and 2) onto the corresponding pieces of lining material (wrong side of fabric). Peel off the backing paper and iron the parts onto the appropriate pieces of fashion fabric (wrong side). Step 2: Put the inner pocket piece #3 right sides together above the marked zipper lines on the lower front to the larger pouch piece #2 so that the marked lines meet. On the pocket piece, stitch along the marked lines in the rectangle.
Step 3: Cut between the seams, and diagonally into the corners. Pull the pocket pouch piece in through the opening and pin. Also press around the rectangle. Pin the zipper under the opening with the teeth visible from the right side. Stitch around with a narrow stitch and foot on the machine. Step 4: Place the other pocket on the inside of the bag, and stitch the pocket pouch 1.5 cm away from the edge. Cut 1 cm of seam allowance all around and finish the edges with the pre-folded bias tape.
Step 5: Stitch the lower front pouch piece #2 at the side of the slit markings right sides together on the upper front pouch piece #1. Press the seam allowances open and continuously press the open edges inbetween the slit edges for the zipper. Pin the zipper under the slit pressed edges with the teeth remaining visible. Stitch around the zipper. Step 6: Pin the outer bag pieces #4 right sides together on top of each other and stitch along the straight seam. Turn the pieces wrong sides together and press the edge then finish with a stitching line. Pin or baste the open curved edges together.
Step 7: Pin/baste the outside pocket on the front so that the lower edges lie on each other. Step 8: Fold the belt pieces #6 & #7 lengthwise in half (wrongs side of the fabric on the outside) and stitch the long edges together. Turn the belts right side out with a safety pin, then press the edges and stitch around. Stitch the ends of each belt piece to the sides of the front the front.
Step 9: Open the zipper and put the back pocket piece #5 on the front pocket (wrong side of the fabric on the outside) and stitch all around. Finish the seam allowances with bias tape. Step 10: Turn the bag to the right side through the zipper opening, and press the edges. Topstitch on the bag along the seam where the belt pieces are stitched.
Step 11: Pull the long strap through the roller buckle, and then put it around the bridge of the clasp. Lead it back around the bridge of the roller buckle and stitch the end of the strap. Lay the end of the short strap around the other bridge and stitch. Finished! Fanny packs are perfect for the summer for bike rides, traveling, and walks around town.