
All images: © Jan Schmiedel

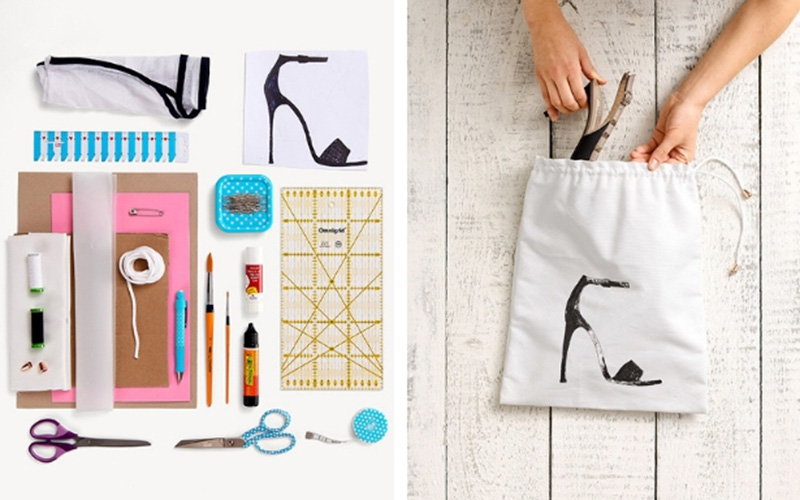
+ Cotton + Thread + Foam rubber + Cardboard + Transparent paper + Glue stick + Chalk + Fabric scissors + Tape measure + Ruler + Hand sewing needle + Ironing cloth + Safety pin + Cord ends + Cord + Paper scissors + Brush + Fabric paint + Pins + Template

Step 1: Cut fabric to approx. 88 x 34 cm. Then finish all edges with a serge or zig-zag stitch. Step 2: Create stamp: Select template ("download here" :https://www.burdastyle.com/pattern_store/patterns/shoe-bag?utm_source=burdastyle.com&utm_medium=referral&utm_campaign=bs-meh-bl-181116-DIYShoeBag-Template) and transfer to tracing paper with a chalk pen.
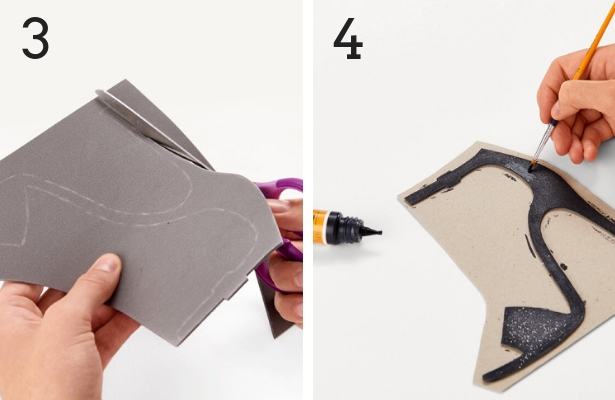
Step 3: Draw template with chalk on foam rubber, and cut out and stick on a piece of cardboard. Step 4: Coat the shoe stamp with textile paint using a brush.

Step 5: Fold fabric (to 44 x 34 cm) and put another piece of cardboard in between. Carefully press the stamp to the desired position. Step 6: Then set the textile paint dye with an iron and pressing cloth.

Step 7: Edge-stitch around the edges of the shoe with a sewing machine. Step 8: Fold the bag right sides together, and stitch the two side seams at 1 cm...

Step 9: ...leaving an opening of 2 cm on both sides at 8 cm from the upper edge. Step 10: Turn and iron the top edge at 6 cm and stitch around 2 cm down from the top edge.

Step 11: Stitch another line 2 cm from the last stitching line - now the tunnel is created! Step 12: Finally, use a safety pin to pull through the cord and knot the cord ends.

FINISHED! Sew a bag for every pair of shoes in your closet!
+ Cotton + Thread + Foam rubber + Cardboard + Transparent paper + Glue stick + Chalk + Fabric scissors + Tape measure + Ruler + Hand sewing needle + Ironing cloth + Safety pin + Cord ends + Cord + Paper scissors + Brush + Fabric paint + Pins + Template
Step 1: Cut fabric to approx. 88 x 34 cm. Then finish all edges with a serge or zig-zag stitch. Step 2: Create stamp: Select template ("download here" :https://www.burdastyle.com/pattern_store/patterns/shoe-bag?utm_source=burdastyle.com&utm_medium=referral&utm_campaign=bs-meh-bl-181116-DIYShoeBag-Template) and transfer to tracing paper with a chalk pen.
Step 3: Draw template with chalk on foam rubber, and cut out and stick on a piece of cardboard. Step 4: Coat the shoe stamp with textile paint using a brush.
Step 5: Fold fabric (to 44 x 34 cm) and put another piece of cardboard in between. Carefully press the stamp to the desired position. Step 6: Then set the textile paint dye with an iron and pressing cloth.
Step 7: Edge-stitch around the edges of the shoe with a sewing machine. Step 8: Fold the bag right sides together, and stitch the two side seams at 1 cm...
Step 9: ...leaving an opening of 2 cm on both sides at 8 cm from the upper edge. Step 10: Turn and iron the top edge at 6 cm and stitch around 2 cm down from the top edge.
Step 11: Stitch another line 2 cm from the last stitching line - now the tunnel is created! Step 12: Finally, use a safety pin to pull through the cord and knot the cord ends.
FINISHED! Sew a bag for every pair of shoes in your closet!